About 93% of US shoppers consider discounts as key factors in their purchasing decisions. In fact, over 67% of shoppers admit that they’ve made a purchase solely because they found a coupon or discount.
These numbers clearly highlight the power of discounts in attracting customers and boosting sales. If you own a WooCommerce store, leveraging discounts effectively can transform your business.
In this article, we’ll learn how to add discounts in WooCommerce. It’ll cover all the types of discounts available in WooCommerce and guide you through the steps to implement them.
Let’s dive in and unlock the potential of discounts to increase your revenue.
What is a WooCommerce Discount?
In WooCommerce, a discount functions just as it does in any other setting. It’s all about giving customers financial benefits through reduced prices or extra perks like free shipping, a complimentary gift, or other special deals.
Imagine you run an online coffee shop using WooCommerce. For International Coffee Day, you decide to give a 30% discount on all coffee beans. When customers visit, they see the lower prices and feel more likely to buy.
You might offer free shipping on orders over $50. Additionally, you can give a free coffee mug when someone buys two or more bags of beans. These are practical ways to use WooCommerce discounts in real life.
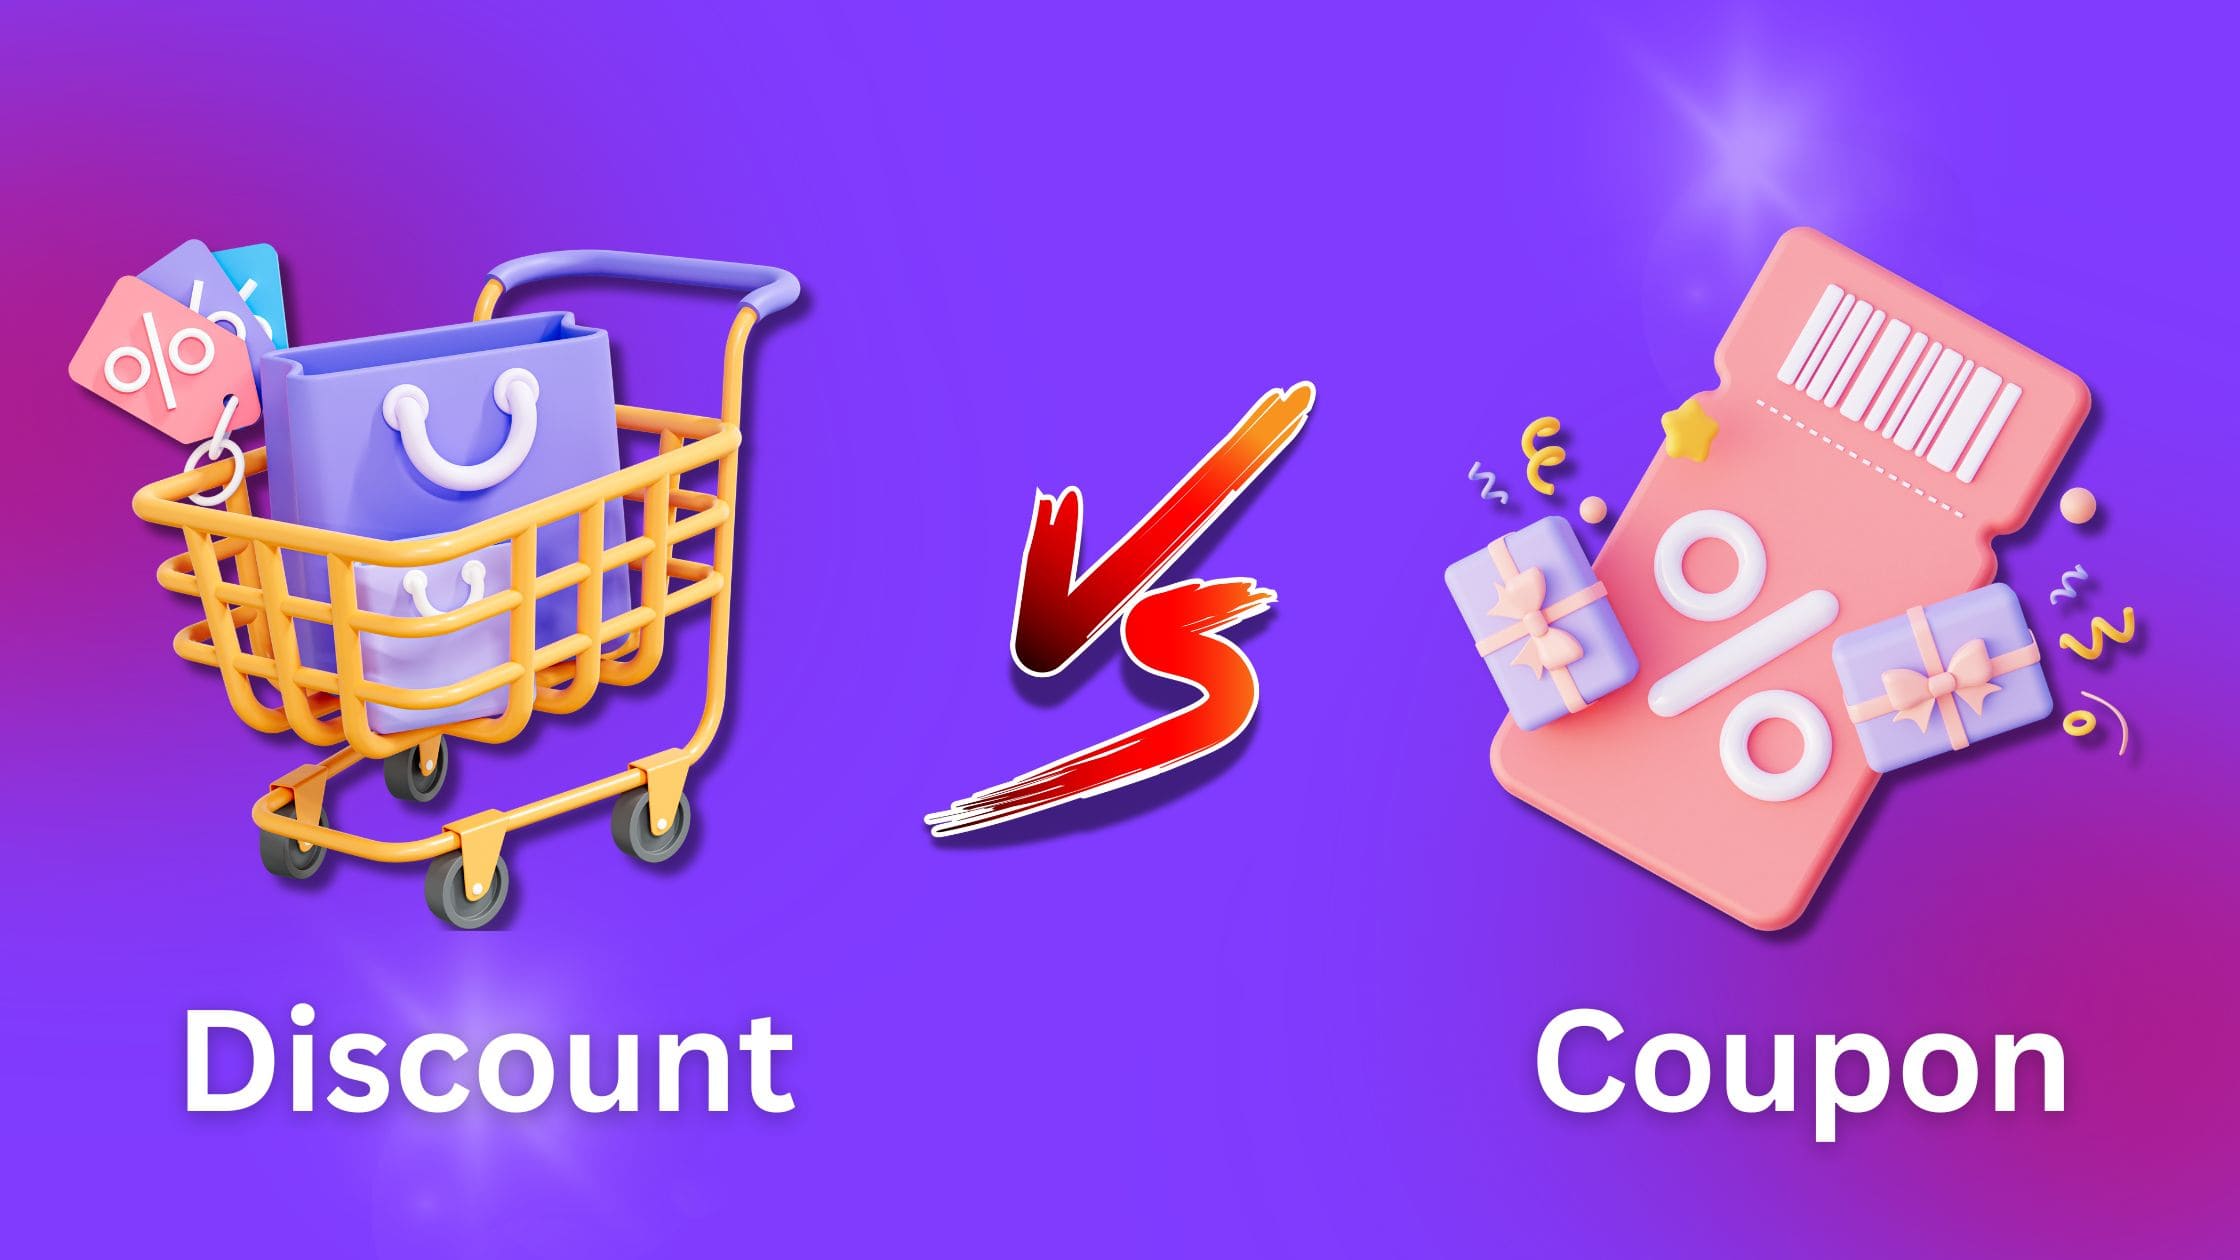
WooCommerce Discount Vs WooCommerce Coupon
Now that you know what WooCommerce discounts are, let’s understand the difference between WooCommerce coupons and discounts.
Coupons require customers to enter a specific code to claim an offer during checkout. The key difference is that customers must manually apply coupons, while discounts are applied automatically.
Usually, it’s not displayed openly in the online store. It’s a personalized approach offered to specific customers to make them feel special.
Placement of Discounts in WooCommerce
Experts suggest that for discounts to be truly effective, they must be strategically placed, such as on product pages, in the shopping cart, or during checkout.
Offering a well-placed discount, particularly at checkout, can be a powerful tool in recovering abandoned sales.
Understanding where to place discounts is essential for maximizing their impact. The best practices for putting discount offers in your WooCommerce store are:
- On the Product Page
- On the Cart Page
- During Checkout
- On the Thank You Page
Additionally, you can use shortcodes to display discounts in any area of your online store. But remember, the above placements are considered standard and most effective.
3 Methods of Adding Discounts in WooCommerce
Discounts can be implemented in multiple ways.
However, There are 3 main methods, each allowing you to create different discounts. You can combine these three methods to display all available discounts in your store.

1. Using WooCommerce’s Built-In Features
WooCommerce offers built-in features for setting up basic discounts. You really don’t need any plugins to do this.
Creating Coupons: WooCommerce allows you to create discount coupons that customers can apply at checkout easily.
Setting Sale Prices: You can set sale prices directly on products to offer discounts.
2. Using Plugins for Advanced Discounts
Plugins are needed to create and apply many types of advanced discounts. Let’s explore the discounts we can make using plugins.
Universal Discounts
- Storewide Discount
- Cart Discount (Discount on Spending)
Product and Category-Specific Discounts
- Fixed Discount for Specific Category
- Percentage Discount for Specific Product
- Buy X Get Y/BOGO Discount
Combination Discounts
- Bundle Discount
- Buy X Get Y Bundle Discount
- Mix & Match Discount
- Frequently Bought Together
- Quantity/Volume Discount
Customer Loyalty and Order-Based Discounts
- First Order Discount
- Next Order Coupon Discount
- Double Order Discount
Discounts Based on Payment Methods
- Free Shipping
- Payment Method Discount
Conditional Discount
- User Role-Based Discount
- Discounts Based on Conditions
3. Custom Coding for Specific Needs
If the built-in features and plugins don’t meet your needs, add custom code to your theme’s `functions.php` file or create a child theme. Always back up your site before making changes.
Note: Use this method if you’re good at coding or have a developer to help.
How to Add Discounts in WooCommerce Using Plugins
Now that we’ve covered discounts based on coupons and sales prices, let’s dive into creating advanced discounts using plugins. We’ll be working with two popular options:
1. WowRevenue
2. WholesaleX
Let’s explore how to set up each plugin and the different discounts you can create with them.
Discounts are a key driver of sales and customer loyalty in eCommerce. WowRevenue offers a variety of discount types to meet different business needs and campaign goals.
In this section, I’ll walk you through how to implement various discount strategies using WowRevenue. Each discount is paired with practical examples.
Start by installing and activating WowRevenue. Then, follow the instructions from your WordPress dashboard for each discount.
Create a Basic Discount Offer
A normal discount is a straightforward way to provide a percentage or flat amount on specific products or categories. It’s perfect for seasonal sales or one-time promotions.
Example: Holiday Sale: Get 15% off on all winter clothing for a limited time.
How to Set Up:
- Navigate to WowRevenue -> Campaigns.
- Click Create Campaign and select Normal Discount.
- Choose a display style: In-Page, Pop-Up, or Floating.
- Set the discount type (percentage or flat rate).
- Choose products or categories.
- Configure additional settings like scheduling.
- Save the campaign.
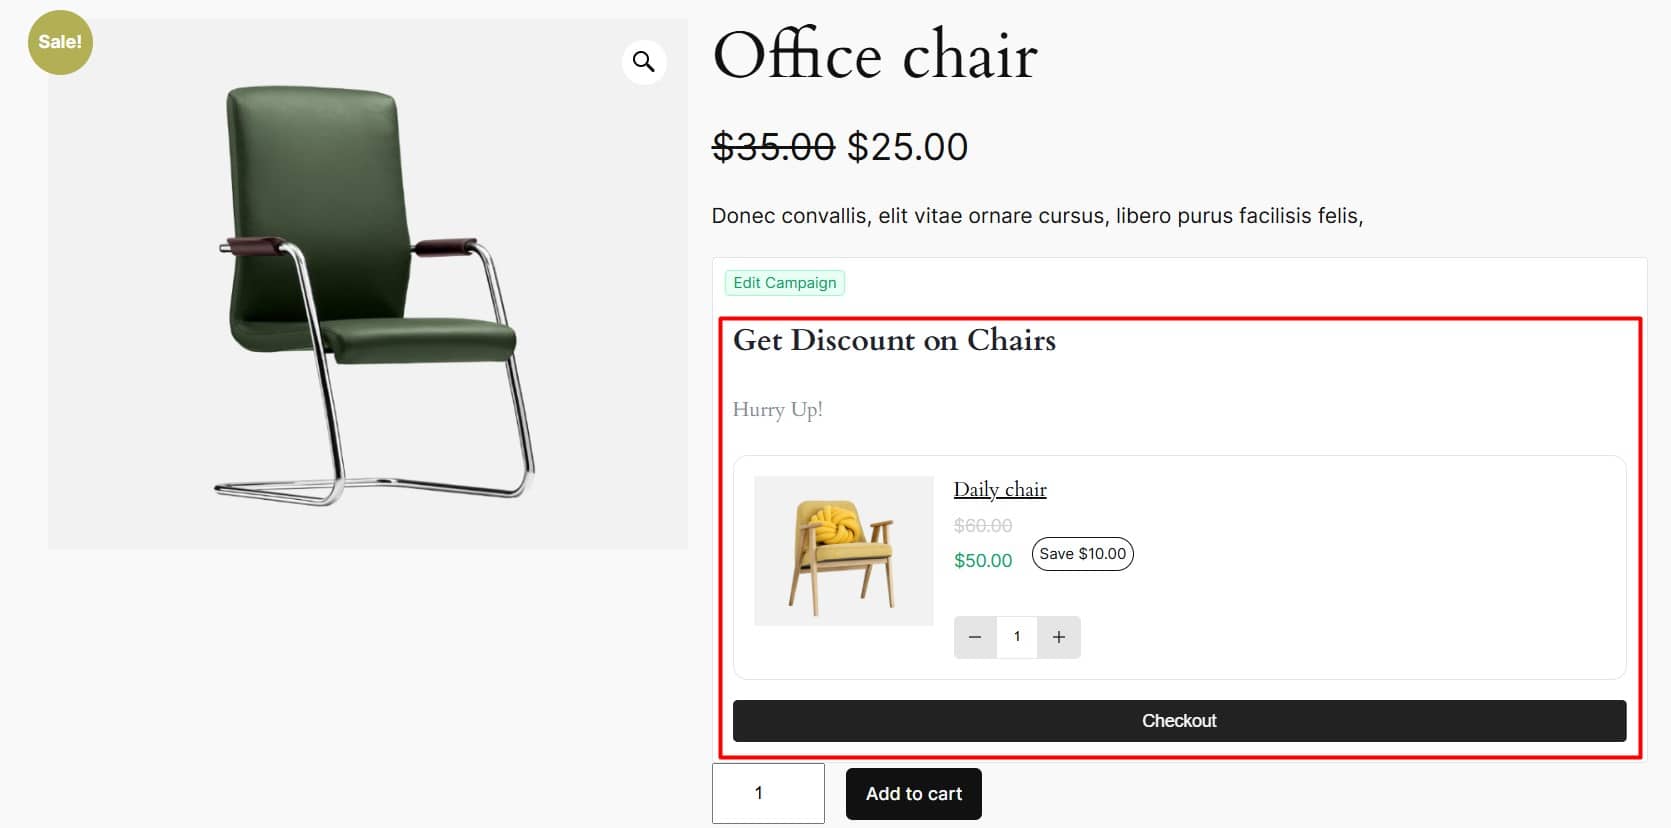
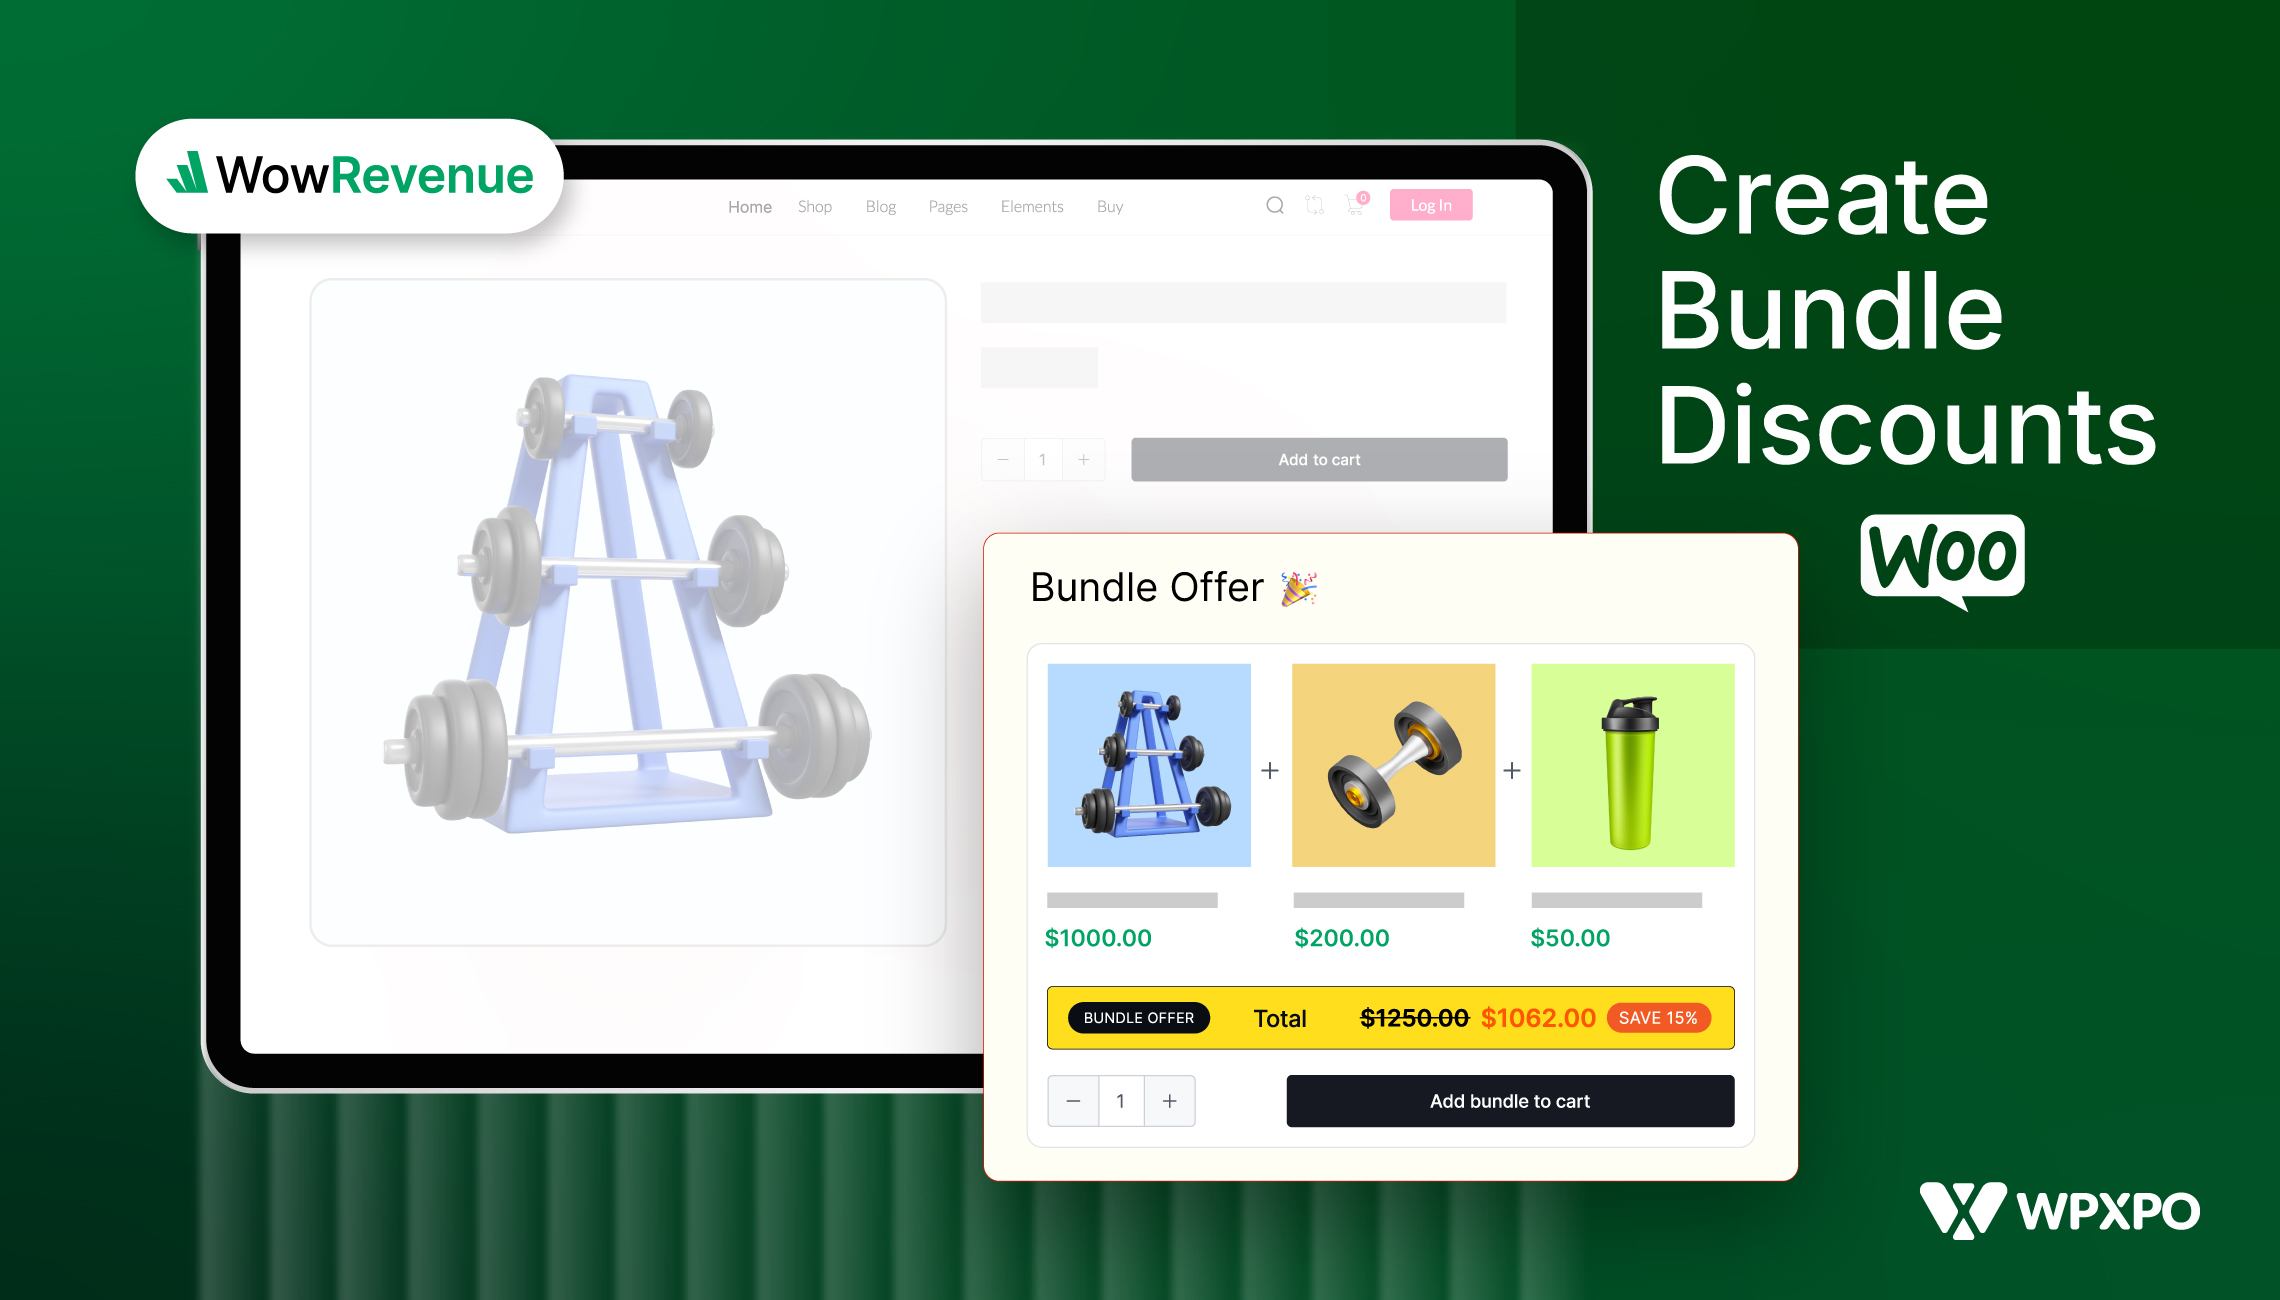
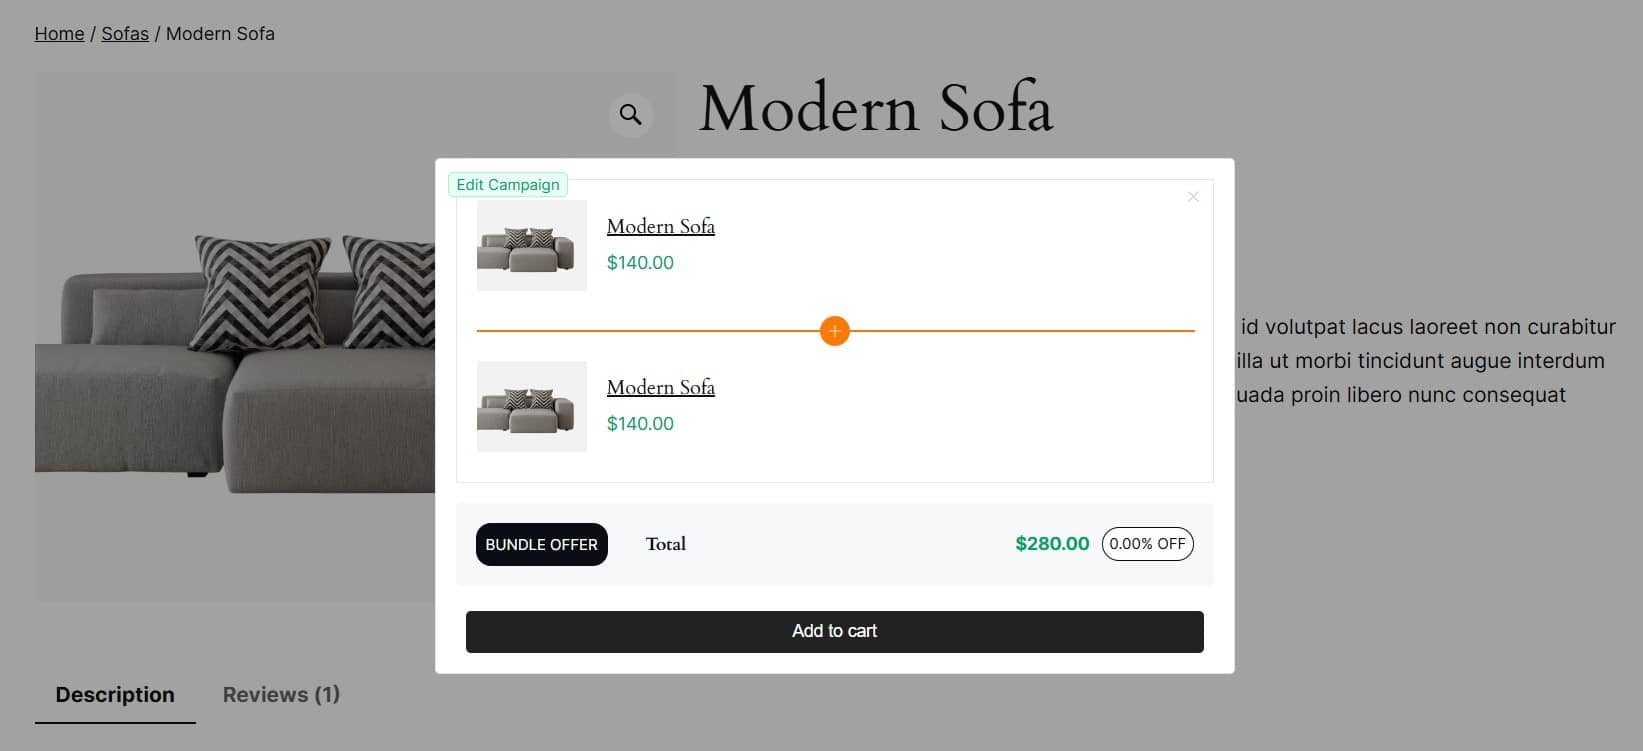
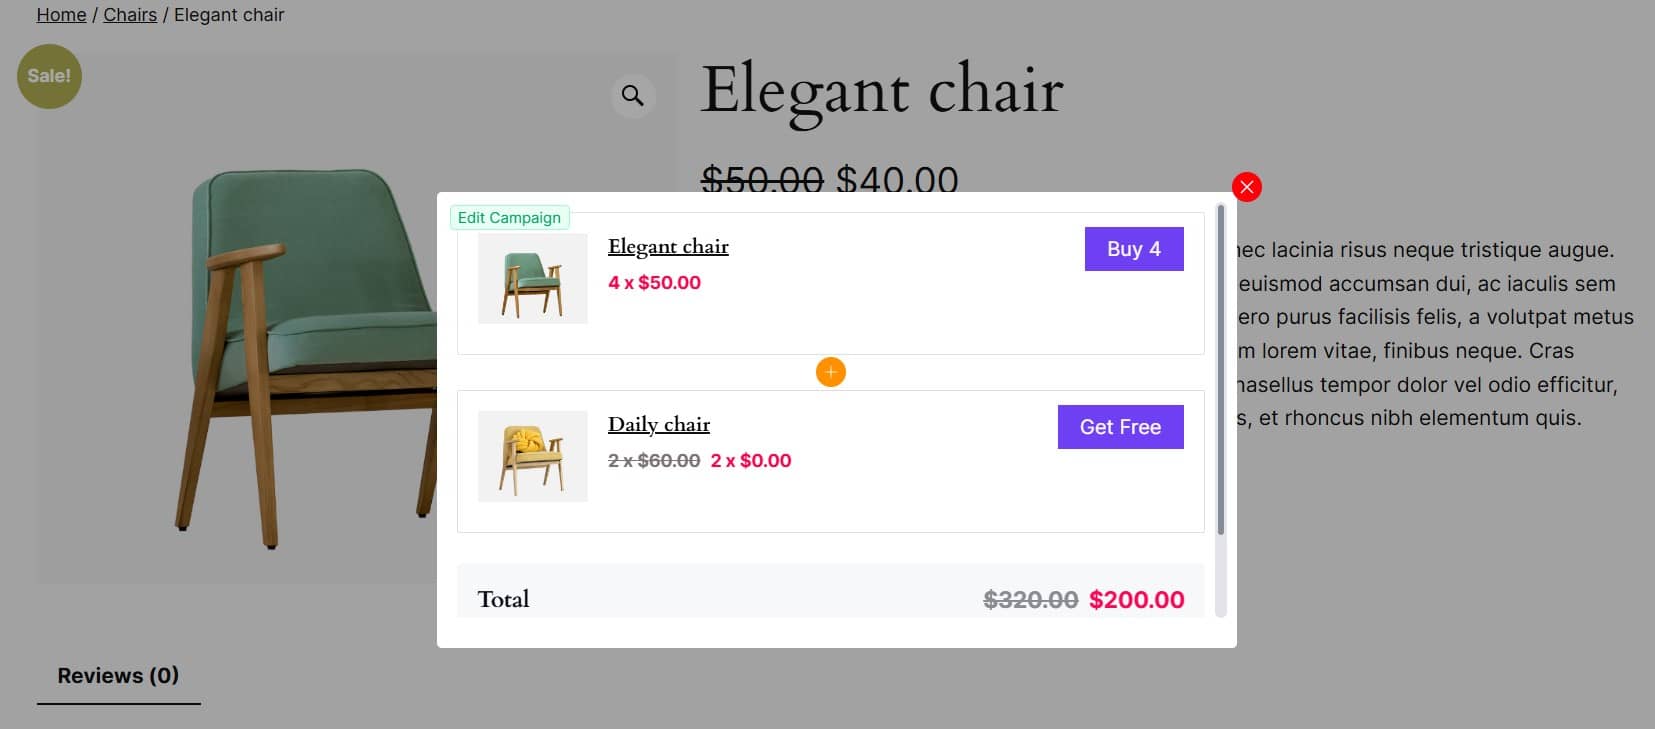
Create a Bundle Discount in WooCommrce?
Bundle discounts encourage customers to buy more by offering a discount on grouped items. This strategy promotes complementary items and boosts the average order value.
Example: Buy a desk, chair, and lamp together and get 20% off.
How to Set Up:
- Navigate to WowRevenue -> Campaigns.
- Click Create Campaign and select Bundle Discount.
- Choose a display style: In-Page, Pop-Up, or Floating.
- Select bundled products and set a discount value.
- Configure where the offer should appear.
- Save and activate the campaign.
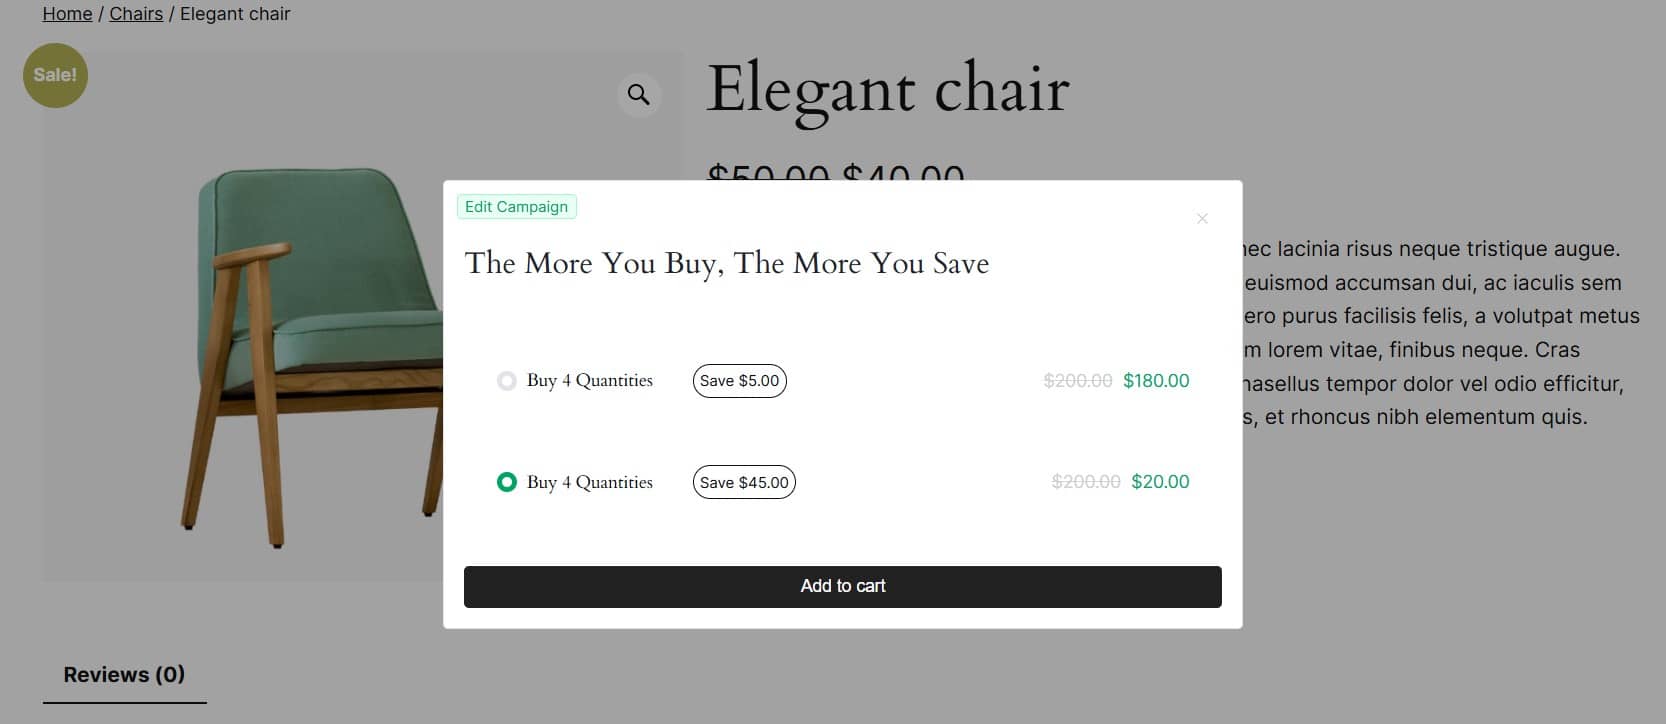
Set Up Quantity Based Discount
Quantity discounts increase the incentive for customers to buy more of a product by offering a higher discount as the quantity increases. This is a popular strategy for wholesale or retail stores.
Example: Buy 5 and Get 4% Discount, Buy 8 and Get 6% Discount, Buy 12 and Get 9% Discount, and so on for All Products.
How to Set Up:
- Navigate to WowRevenue -> Campaigns.
- Click Create Campaign and select Quantity/Volume Discount.
- Choose a display style: In-Page, Pop-Up, or Floating.
- Define discount tiers like “Buy 5, get 4% off.”
- Adjust other campaign settings.
- Save and activate the campaign.
Create BOGO or Buy X Get Y Offers
Buy X Get Y (BOGO) is an effective strategy to promote new products or clear out slow-moving inventory. This discount type encourages customers to purchase by offering a free or discounted item with their purchase.
Example: Buy 1 Shirt and Get 1 Free on select styles.
How to Set Up:
- Navigate to WowRevenue -> Campaigns.
- Click Create Campaign and select Buy X Get Y.
- Choose a display style: In-Page, Pop-Up, or Floating.
- Set Product X to buy and Product Y as the reward.
- Configure the discount type for Product Y.
- Choose where to display the offer.
- Save and activate the campaign.
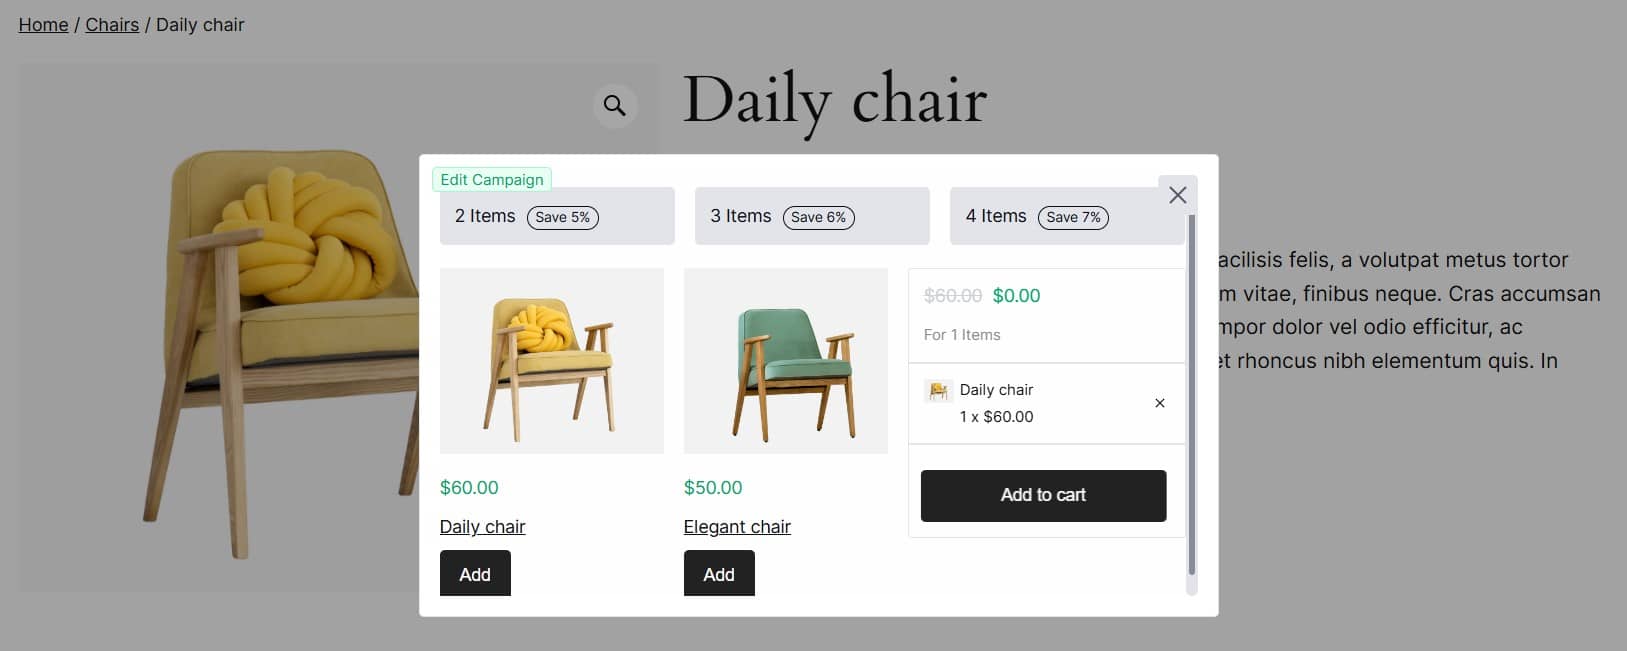
Set Up Mix and Match Discount
Mix & Match discounts allow customers to choose items from a selected group and receive a discount when a specific quantity is reached. This strategy is effective for stores with a wide range of related products.
Example: Mix & Match: Choose any 4 skincare products and get 15% off.
How to Set Up:
- Navigate to WowRevenue -> Campaigns.
- Click Create Campaign and select Mix & Match Discount.
- Choose a display style: In-Page, Pop-Up, or Floating.
- Select products or categories that qualify for the discount.
- Set the required quantity needed to activate the discount.
- Save and activate the campaign.
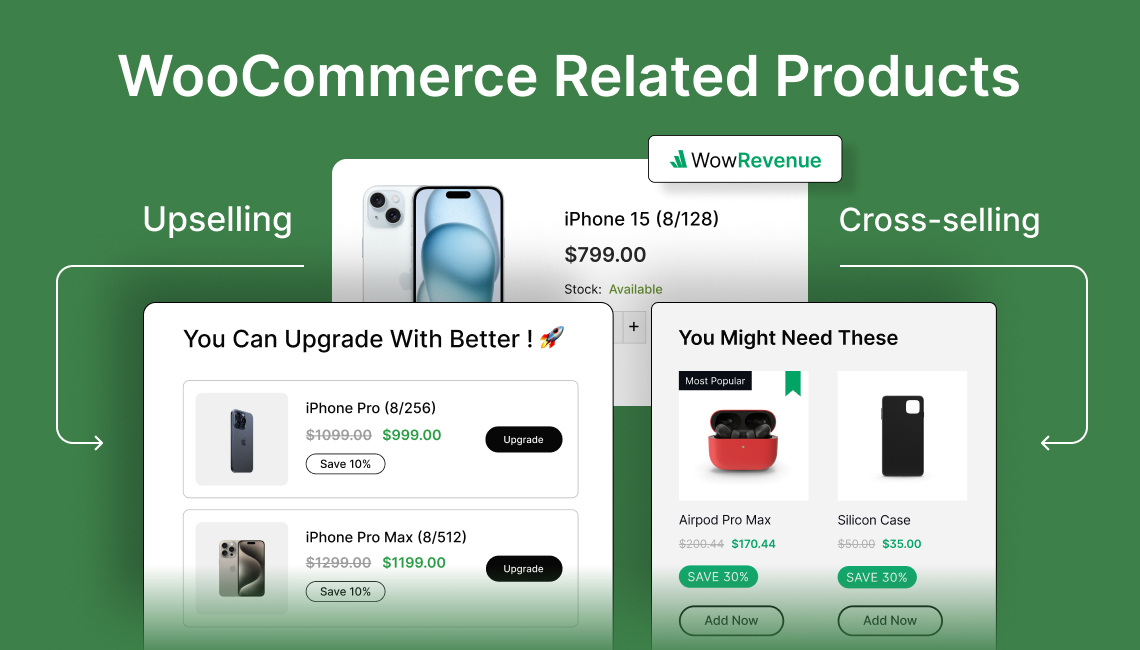
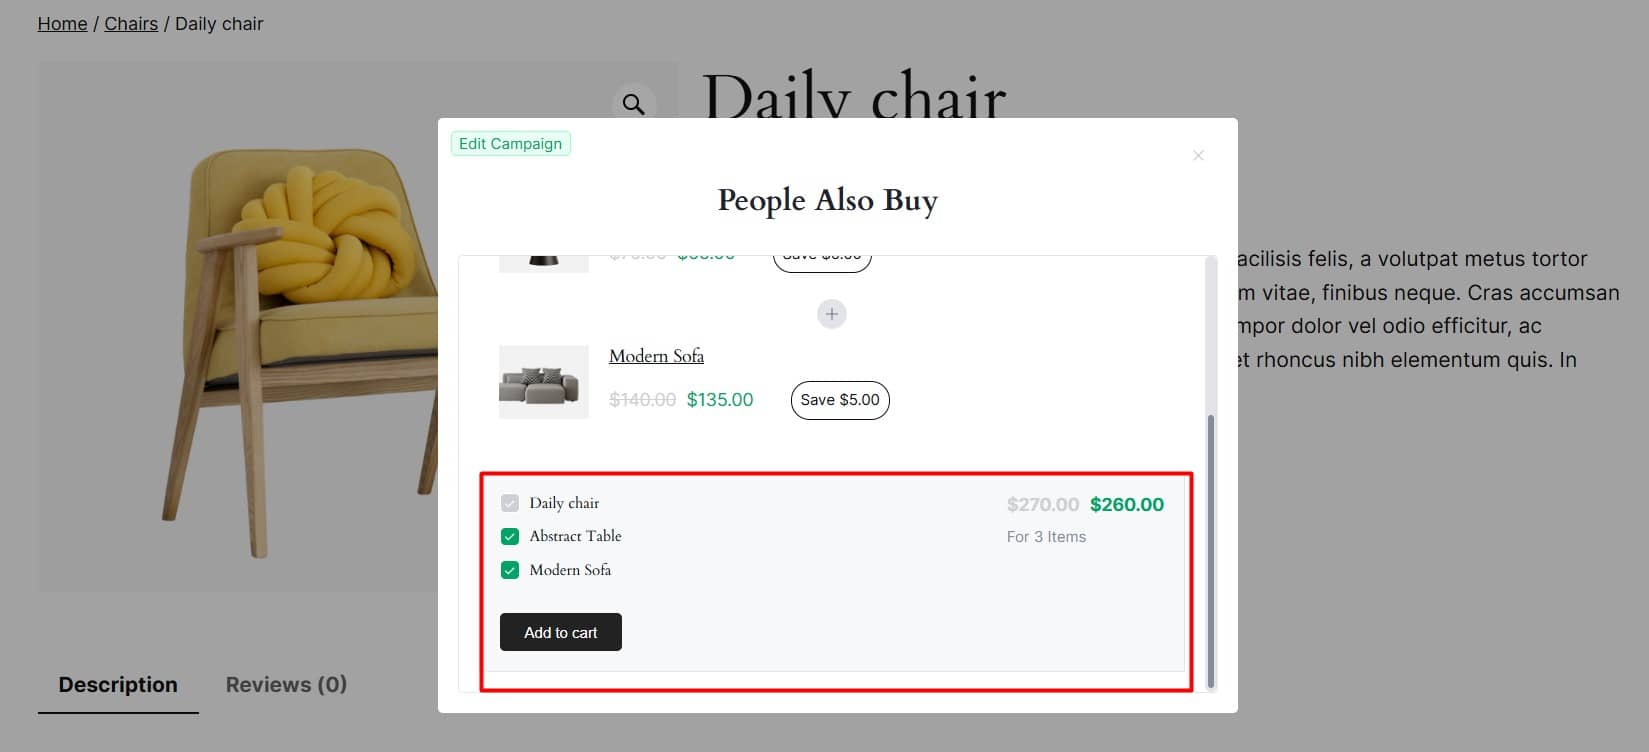
Create Frequently Bought Together
The Frequently Bought Together discount suggests complementary items to customers, boosting the order value by encouraging the purchase of additional products.
Example: Frequently Bought Together: Buy a camera with a tripod and memory card, and get 15% off on the accessories.
How to Set Up:
- Navigate to WowRevenue -> Campaigns.
- Click Create Campaign and select Frequently Bought Together.
- Choose a display style: In-Page, Pop-Up, or Floating.
- Select the main and complementary products to display.
- Set a discount value for the complementary items.
- Configure placement and display options.
- Save and activate the campaign.
The following types of discounts will be available soon. You’ll be able to create them using WowRevenue as well. When they’re available, I’ll share updates—so stay tuned!
- Discount on Spending
- Double Order Discount
- Buy X Get Y Bundle Discount
- First Order Discount
- Next Order Coupon Discount
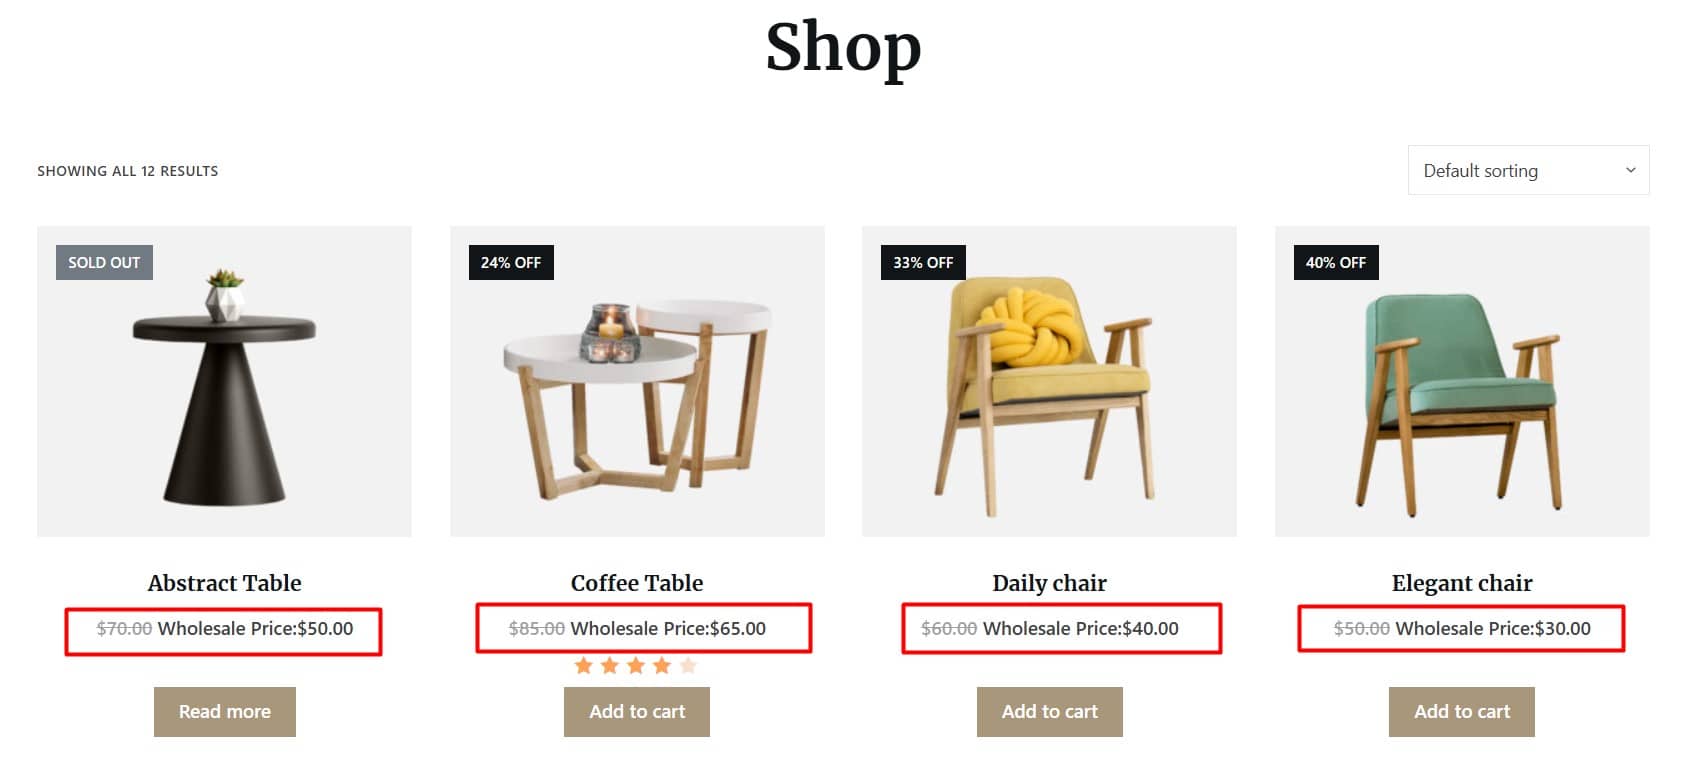
WowRevenue covers all the most used discounts, but with WholesaleX, you can add even more popular discount options.
WholesaleX offers seamless discount management, dynamic pricing, user role-based discounts, bulk discounts, and more. It is specifically designed to streamline B2B and wholesale operations.
In this part, I’ll walk you through implementing various discount strategies using WholesaleX. Each discount is paired with practical examples.
Start by installing and activating WholesaleX. Then, follow the instructions from your WordPress dashboard for each discount.
Set Up Category Discount in WooCommerce
This discount is applied to products in a specific category, perfect for promoting particular product lines.
Example: A store offers a 15% discount on all winter apparel during the colder months.
How to Set It Up:
- Navigate to WholesaleX > Dynamic Rules
- Click Create Dynamic Rule and select Rule Type as Product Discount
- Choose the product filter for Categories in list
- Choose the discount type Amount & the discount amount (e.g., 15%)
- Click Save and test the discount on your website
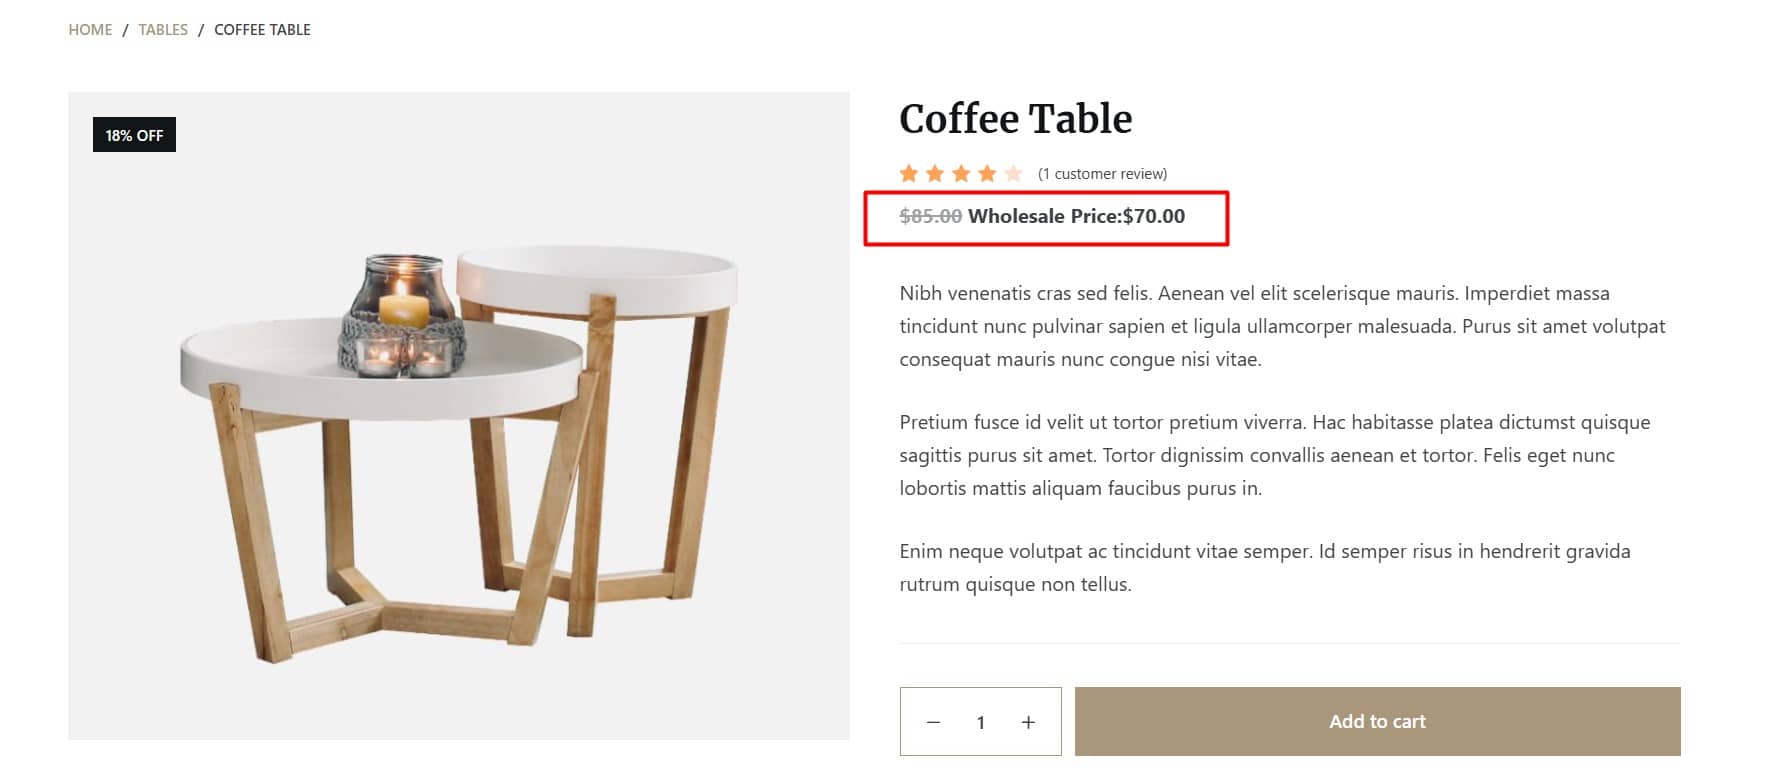
Create Cart Discount in WooCommerce
This discount is based on the total amount in a customer’s cart, encouraging higher spending.
Example: Customers receive a $20 discount on orders above $150.
How to Set It Up:
- Navigate to WholesaleX > Dynamic Rules
- Click Create Dynamic Rule and select Rule Type as Cart Discount
- Choose the product filter for All Products
- Specify the cart value (e.g., $150) and discount amount (e.g., $20)
- Save and enable the rule.
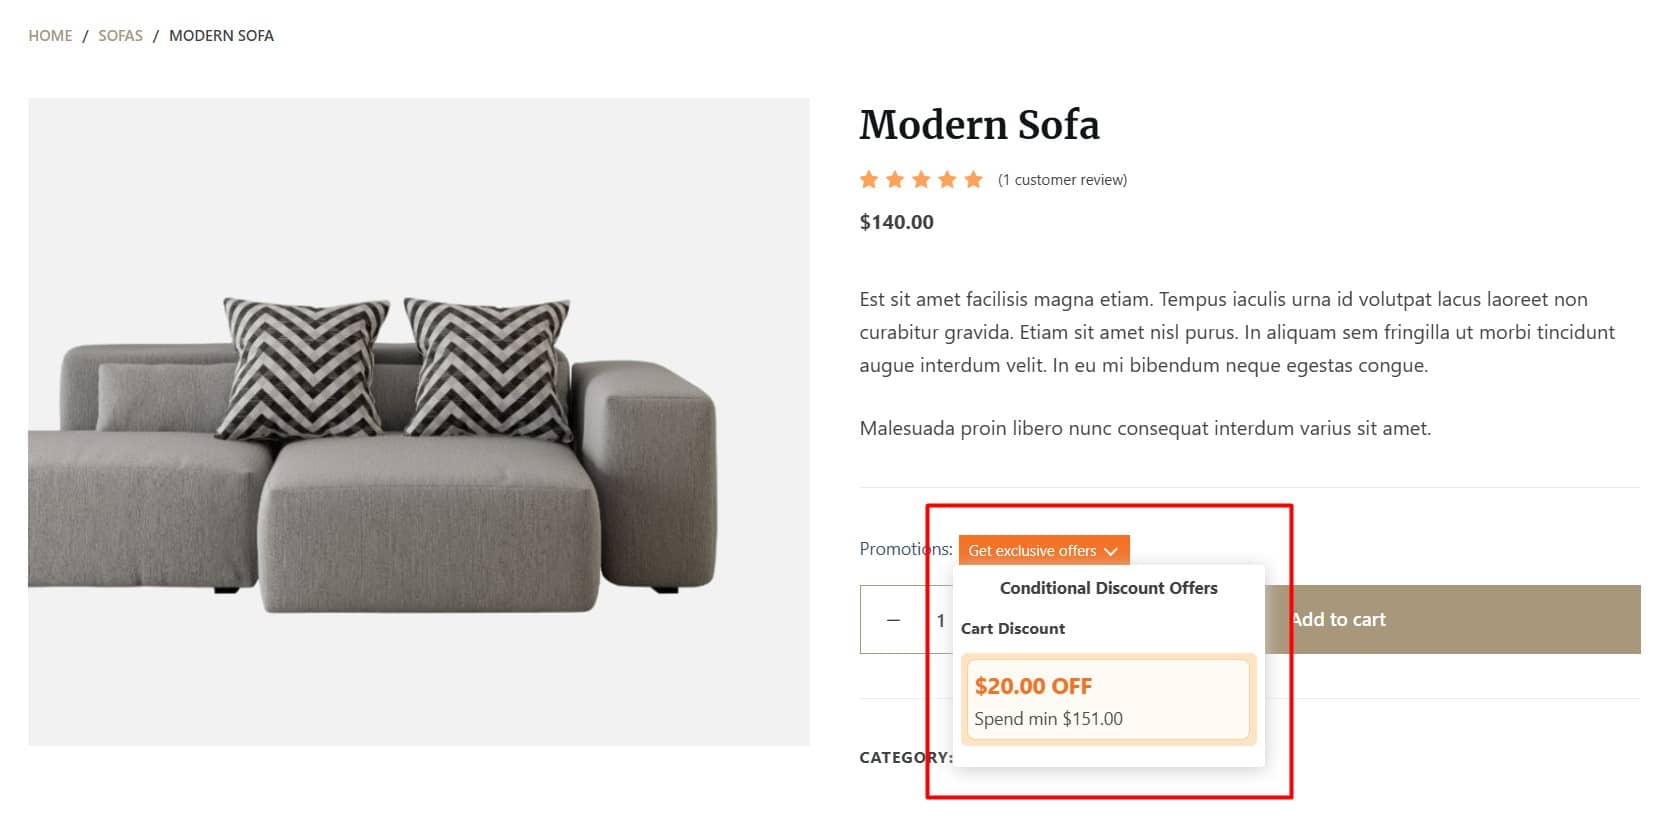
To learn more details, you can read this article about how to create cart discounts in WooCommerce.
Offer Payment Method Discount
This discount is given for using specific payment methods, such as a 5% discount for paying via bank transfer.
Example: Customers receive a 5% discount if they choose to pay using a check instead of Paypal.
How to Set It Up:
- Navigate to WholesaleX > Dynamic Rules
- Select Rule Type as Payment Method Discount
- Choose the payment gateway as Check Payments
- Specify the discount amount (e.g., 5%)
- Save and enable the rule
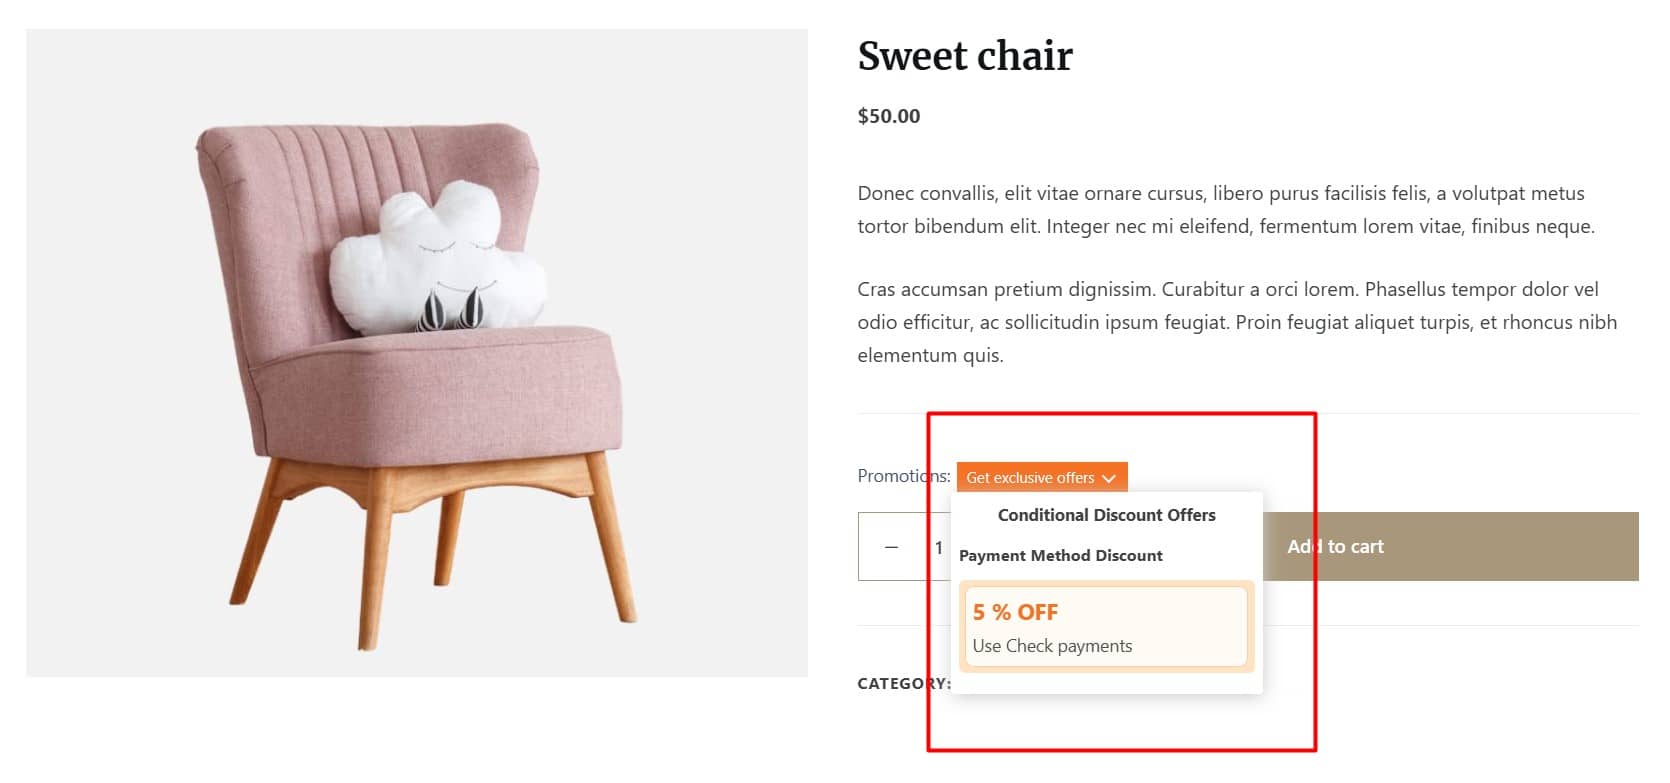
You can also read this article about How to Offer Payment Method Discounts in WooCommerce.
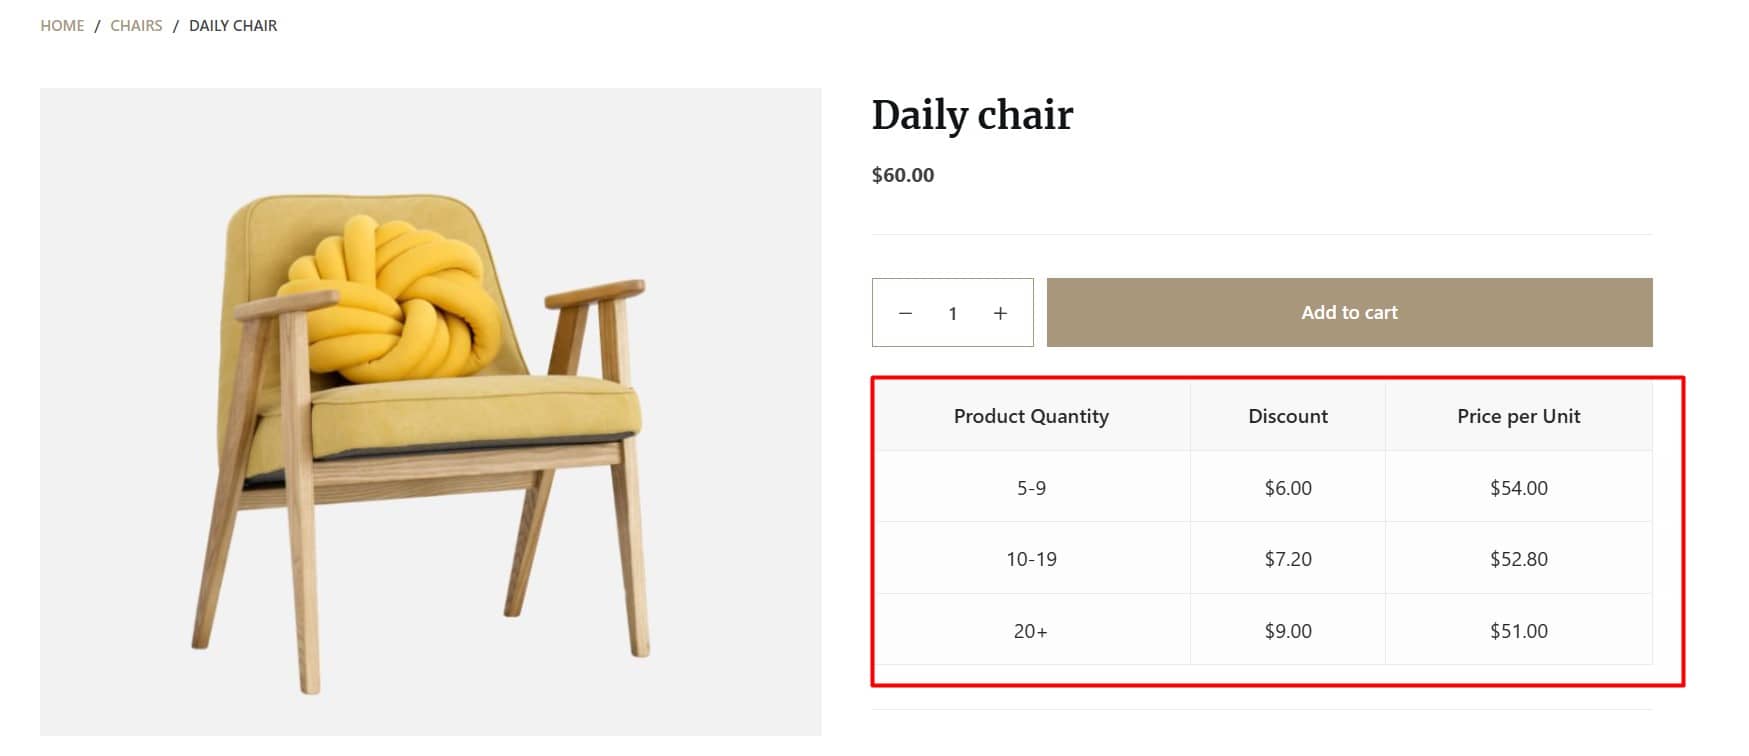
Offer Quantity-Based Discounts for All Products
Discounts based on quantity encourage bulk buying. This discount type is ideal for wholesale stores.
Example: Customers get a 12% discount if they purchase 10 or more items.
How to Set It Up:
- Navigate to WholesaleX > Dynamic Rules
- Select Rule Type as Quantity Based Discount
- Choose the product filter for All Products
- Choose the discount type Percentage & the discount amount (e.g., 12%)
- Set discount based on quantity
- Click Save and test the discount on your website
How to Create Coupons in WooCommerce
Now that we’ve explored the basics of discounts and their ideal placement, let’s learn how to set up coupons and sales prices using WooCommerce’s built-in features.
Setting up coupons in WooCommerce is a smart way to offer discounts to your customers. It comes with a built-in coupon feature that’s simple to set up. But if you want additional functionalities, you can explore third-party solutions.
But for now, let’s focus on how to use WooCommerce’s default settings to create your coupons.
From your WordPress dashboard, navigate to Marketing → Coupons → Add Coupon. Here, you’ll create your coupon code and add a description to explain what the coupon is for.
Next, you’ll need to go through a simple three-step setup process. Let’s break them down:
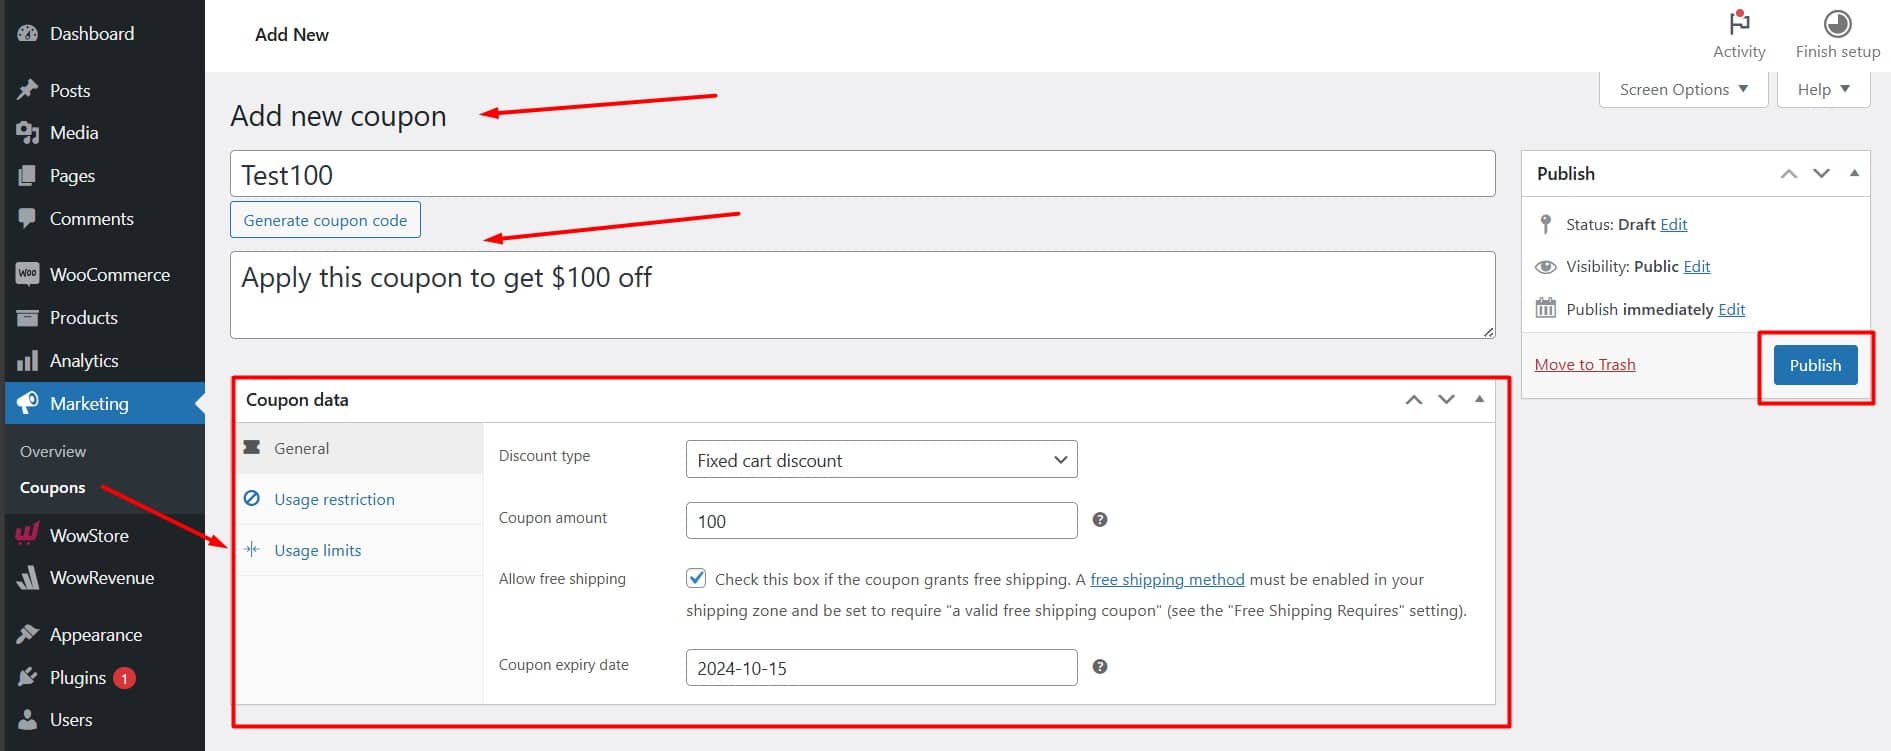
General Settings
In this section, you’ll select the type of discount (e.g., percentage or fixed amount), set the coupon amount, and choose an expiry date for the coupon. You can enable free shipping with the coupon too.
Usage Restriction
This step lets you control how the coupon is used. You can set minimum or maximum spending limits to qualify for the discount, and specify the products or categories it applies to.
You can even mark the coupon for “individual use only,” so customers can’t combine it with other coupons.
Usage Limits
In this final step, you can define how many times the coupon can be used overall and how many times a single customer can use it. This helps you manage your coupons more effectively and avoid overuse.
Customers who meet the criteria—like minimum spend or purchasing specific products—can enter the coupon code at checkout to enjoy the discount.
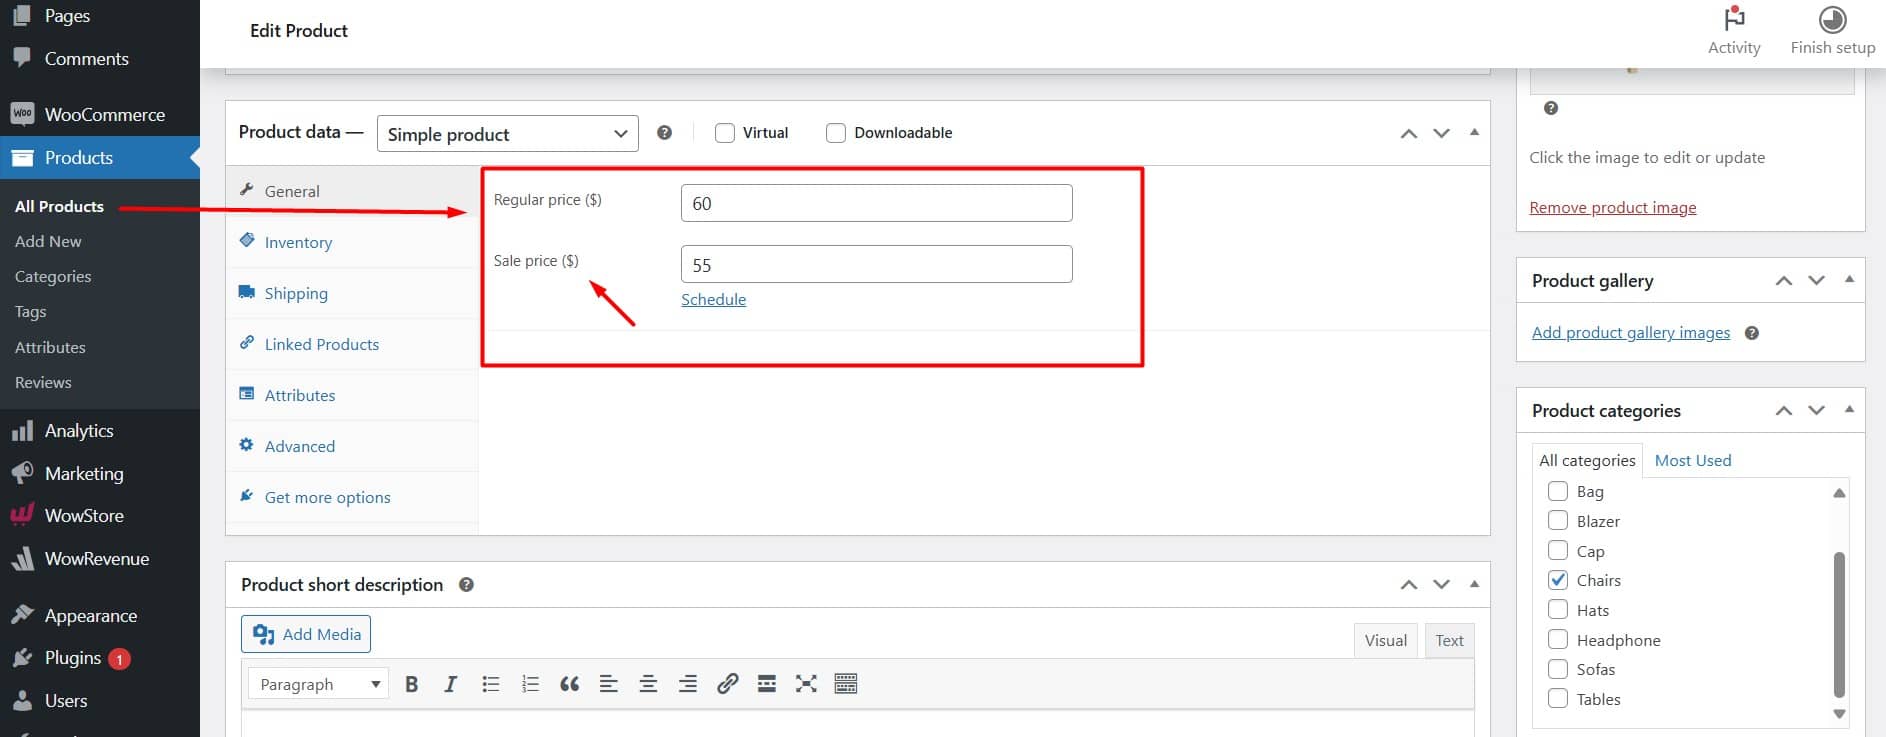
How to Set Sale Prices in WooCommerce
Another simple way to offer discounts is by setting sale prices on individual products. This method temporarily lowers selected items’ prices to draw in more customers.
To set a sale price:
- From your WordPress dashboard, go to Products > All Products
- Edit the product you want to discount
- In the Product Data section, enter the regular and sale prices
- Optionally, schedule the sale by setting start and end dates
- Update the product to apply the sale price
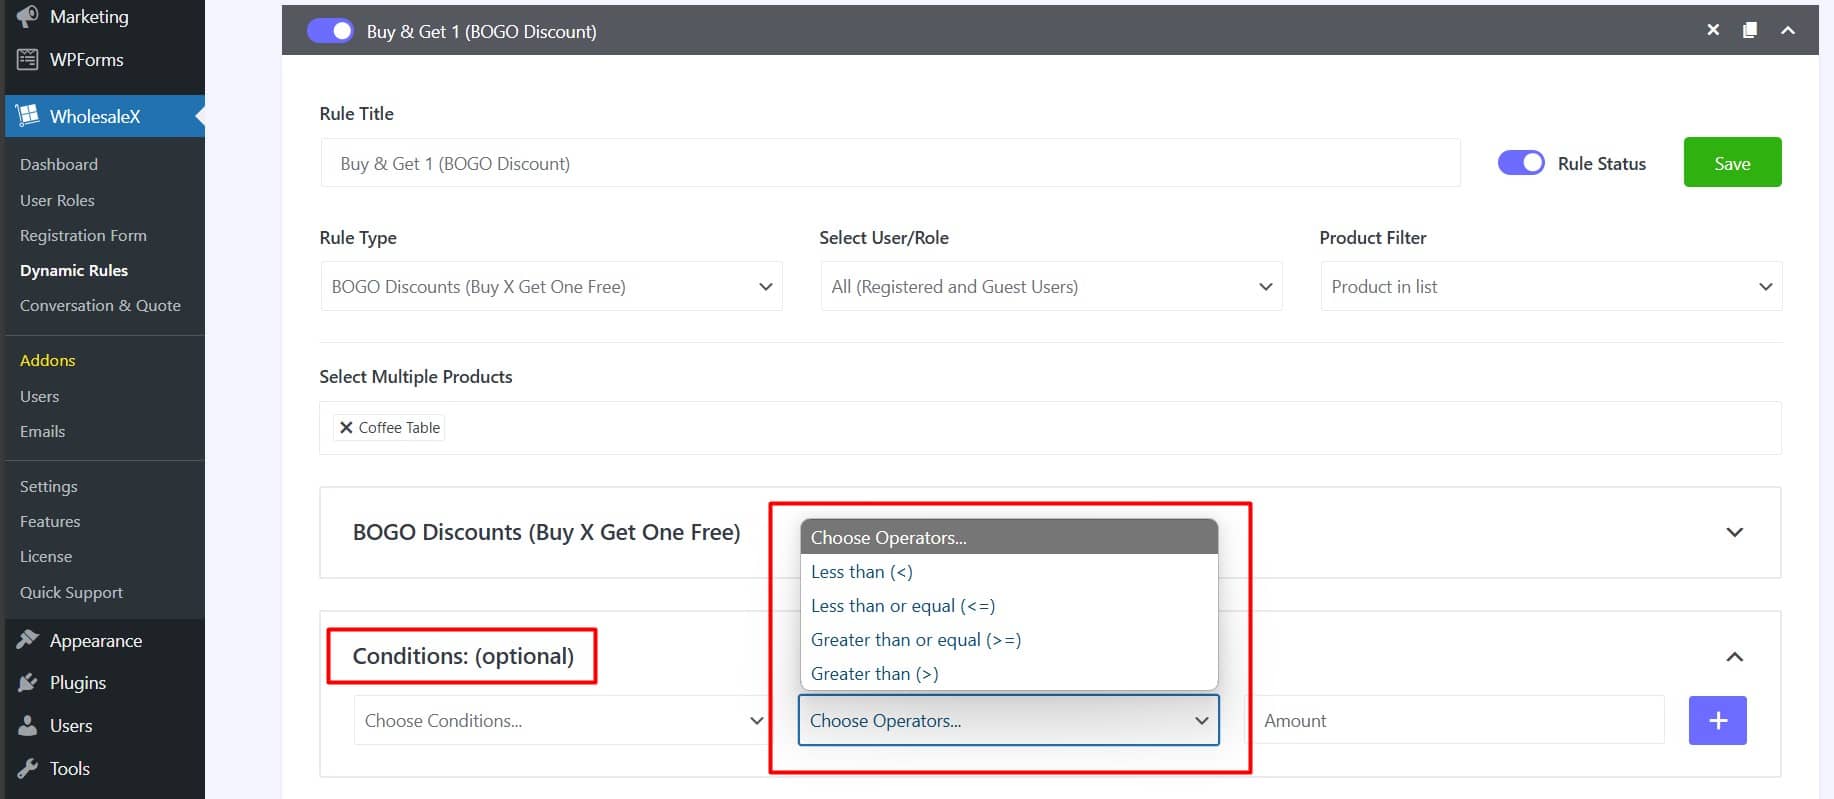
Can I Set Up Conditional Discounts in WooCommerce?
Conditional discounts are based on factors such as cart value, specific products, or customer location.
Example: A store offers a 15% discount to customers from a particular state if their order value exceeds $100.
How to Set It Up:
- Install and activate WholesaleX
- Navigate to WholesaleX > Dynamic Rules
- Click Create Dynamic Rule
- Head over to Conditions
- Choose Condition type, Operator, and Amount (e.g., $100 )
- Specify the discount amount (e.g., 15%)
- Save and enable the rule.
For more advanced configurations and real-time use cases, visit the WholesaleX Website
Can I Create a Storewide Discount in WooCommerce?
A storewide discount is applied to every product in your store, regardless of category. It is an excellent strategy for boosting sales during special promotions like holiday sales.
Example: During Black Friday, a 20% discount is applied to all products in the store.
How to Set It Up:
- Install and activate WholesaleX
- Navigate to WholesaleX > Dynamic Rules
- Click Create Dynamic Rule and select Rule Type as Product Discount
- Choose the product filter for All Products
- Choose the discount amount (e.g., 20%)
- Click Save and test the discount on your website
For a detailed guide, check out the article
Can I Set User Role-Based Discounts in WooCommerce?
These discounts are based on user roles such as VIPs, wholesale buyers, or registered members.
Example: A store offers a 10% discount to VIP customers while regular customers see standard prices.
How to Set It Up:
- Install and activate WholesaleX
- Navigate to WholesaleX > Dynamic Rules
- Click Create Dynamic Rule and select Rule Type as Product Discount
- Select the User Role to VIP
- Choose the product filter for All Products
- Specify the discount amount (e.g., 10%)
- Save and enable the rule
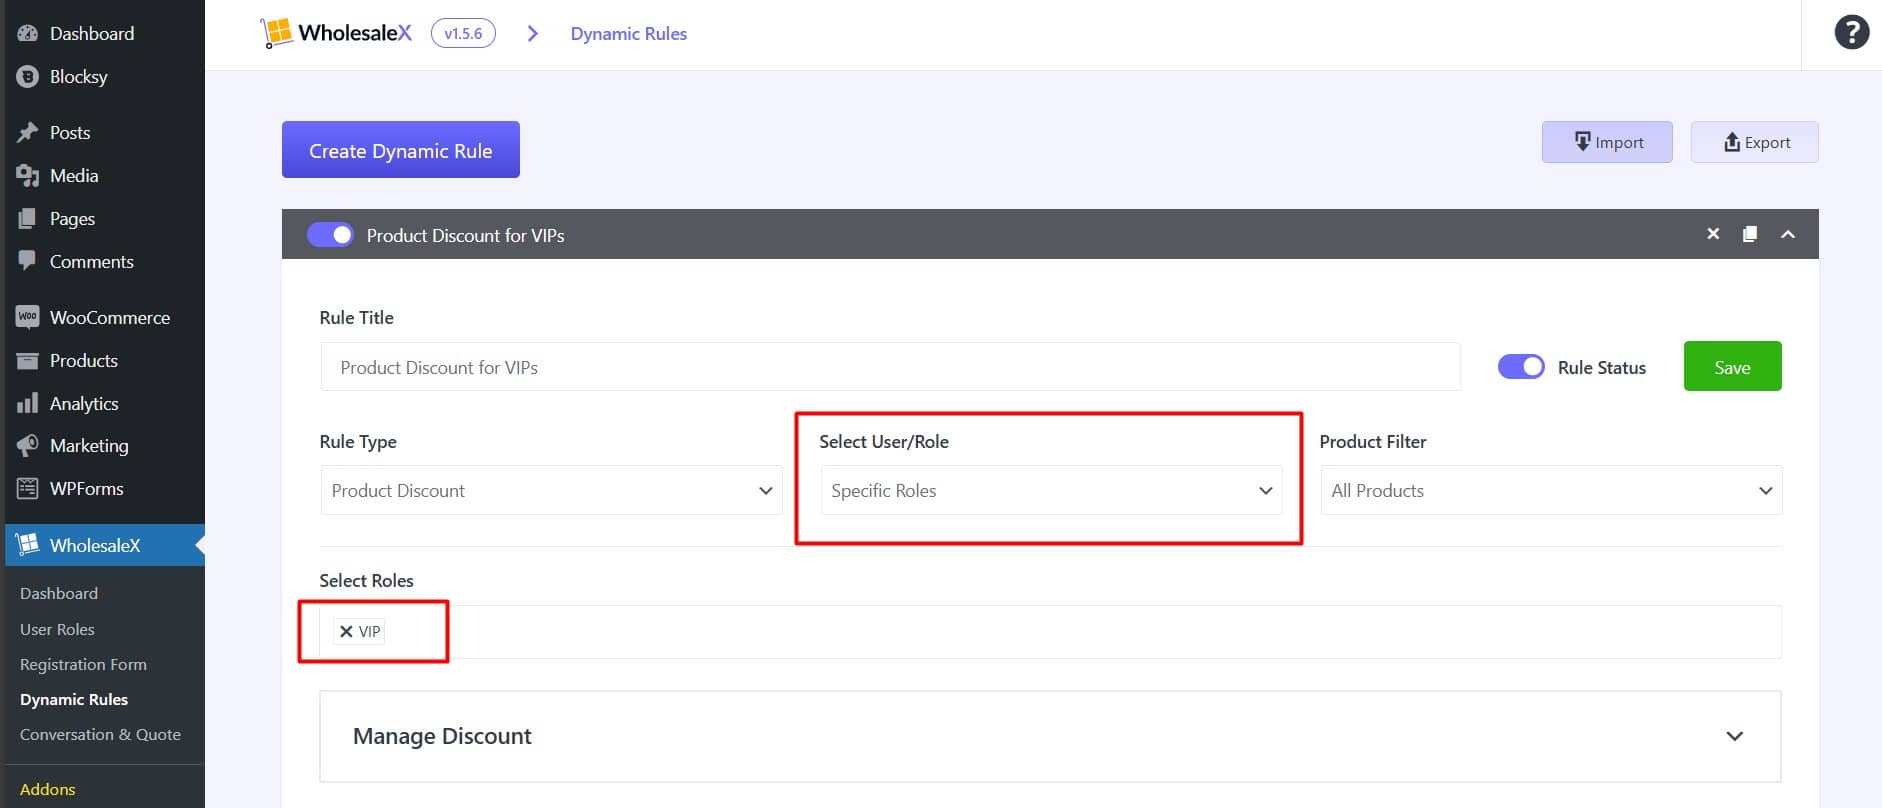
You can read this article about How to Set WooCommerce role-based Pricing to learn more.
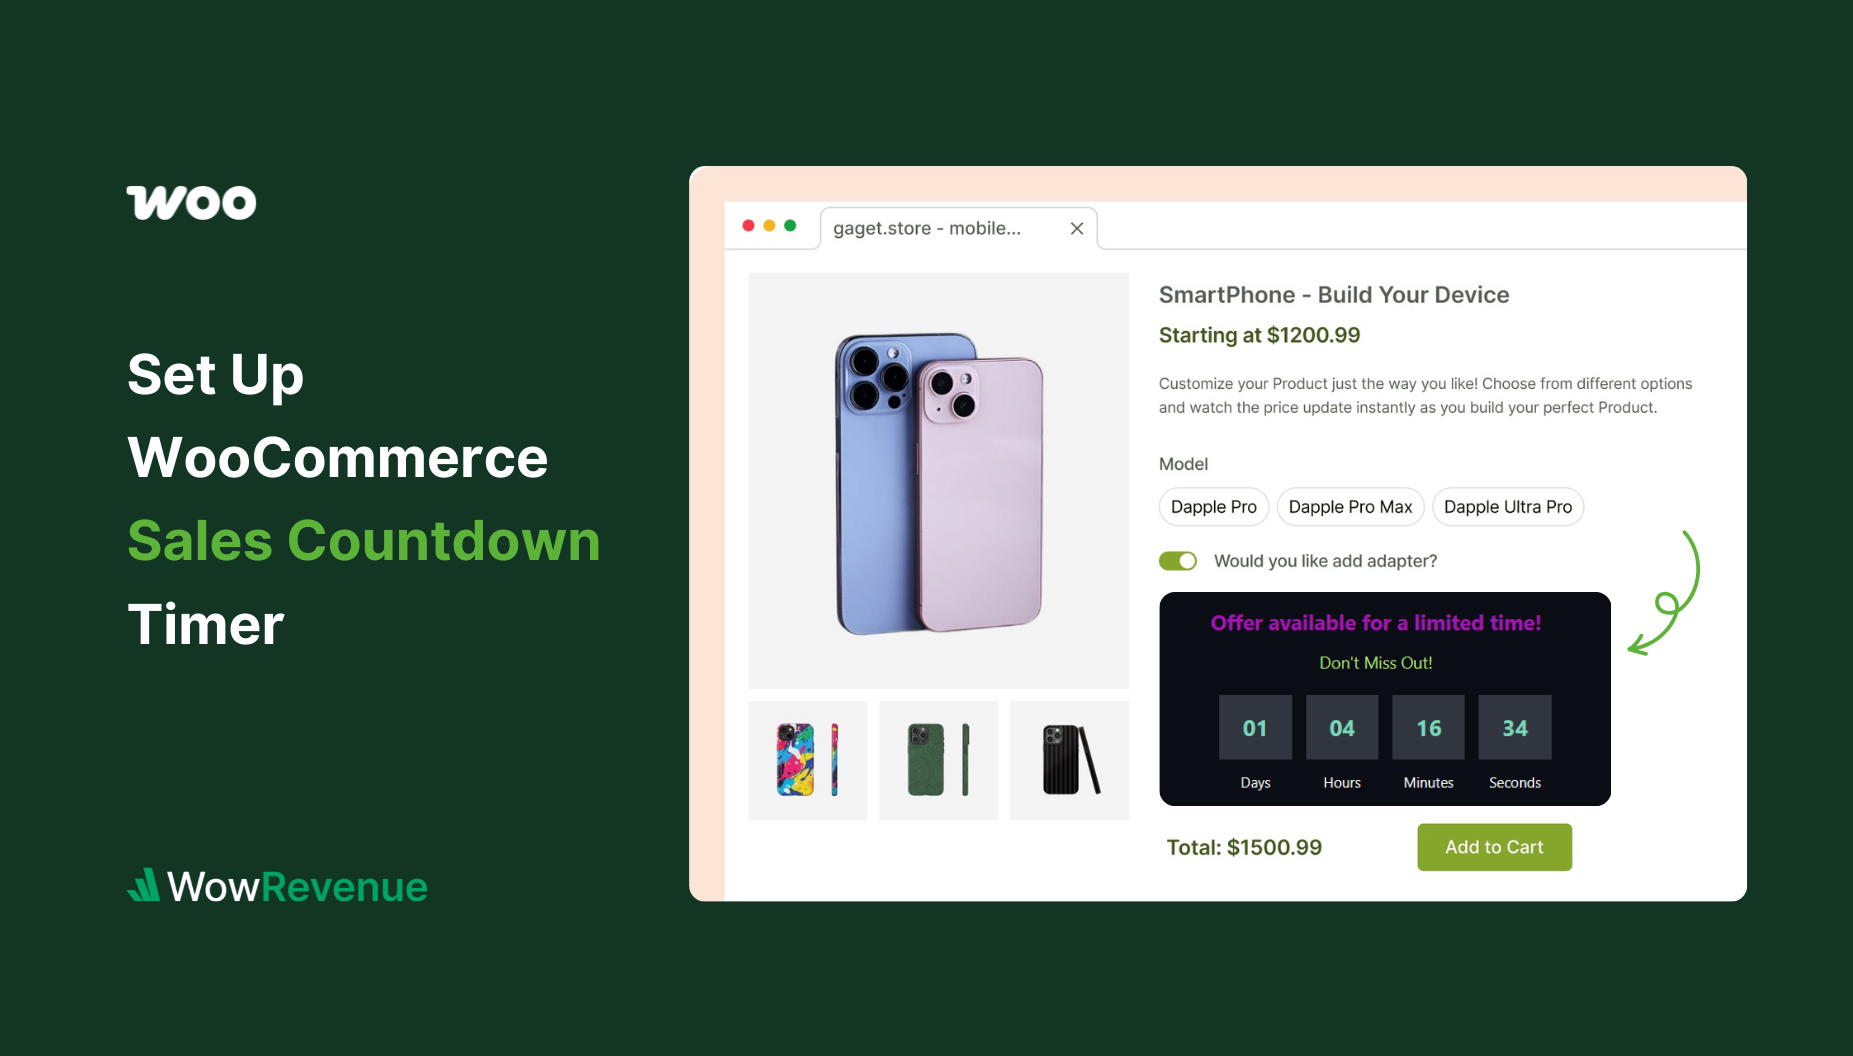
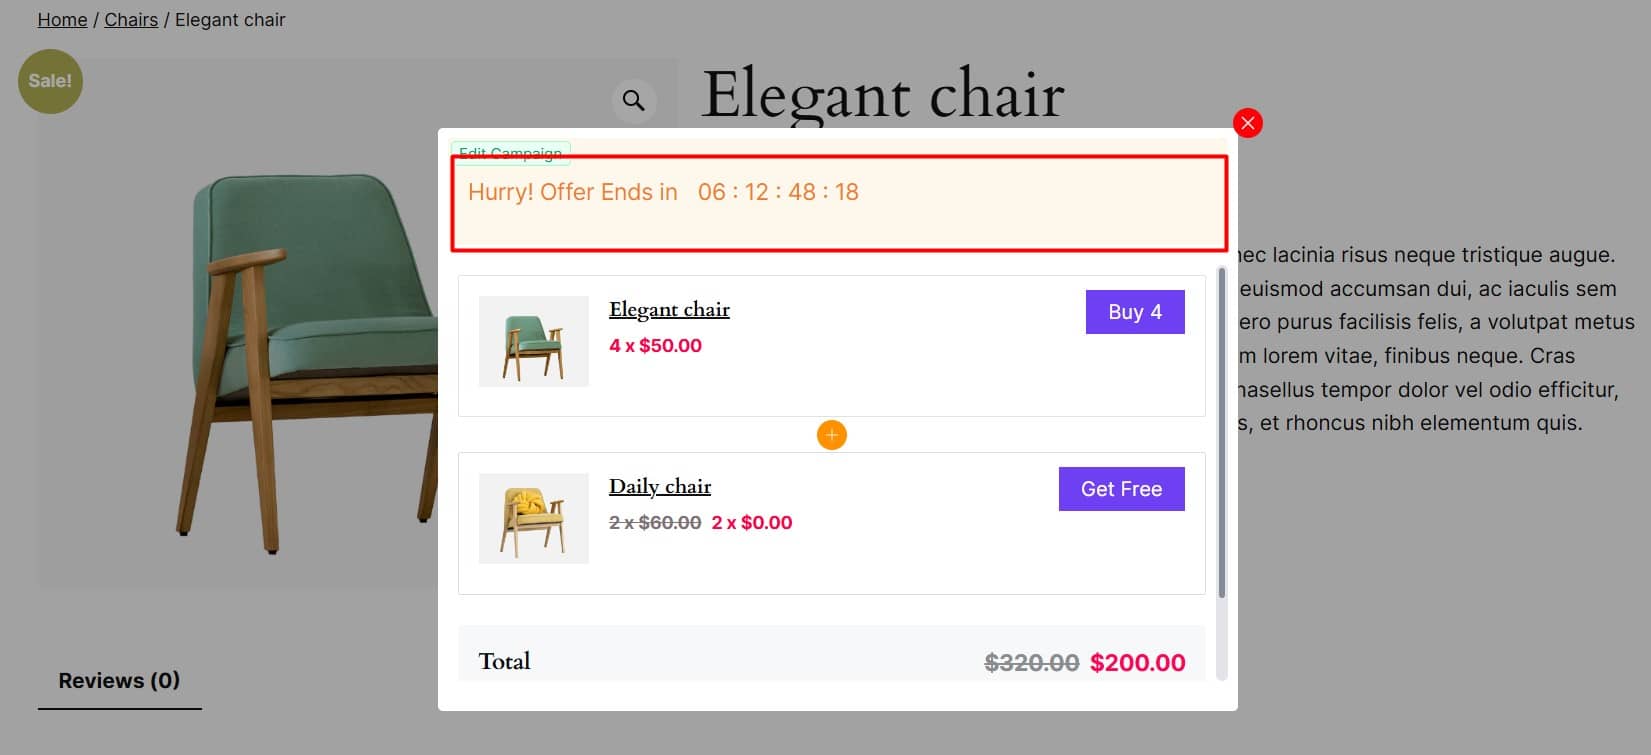
Can I Create a Limited-Time Offer in WooCommerce?
A limited-time offer is a discount for a short period to encourage quick purchases. It creates urgency and boosts sales by setting specific time limits for the offer.
Example: 30% off for the next 24 hours only.
How to Set Up:
- Install and activate WowRevenue
- Navigate to WowRevenue -> Campaigns.
- Click Create Campaign and select any campaign type.
- Choose a display style: In-Page, Pop-Up, or Floating.
- Scroll down to Countdown Timer Setup.
- Set the start and end date.
- Update the campaign.
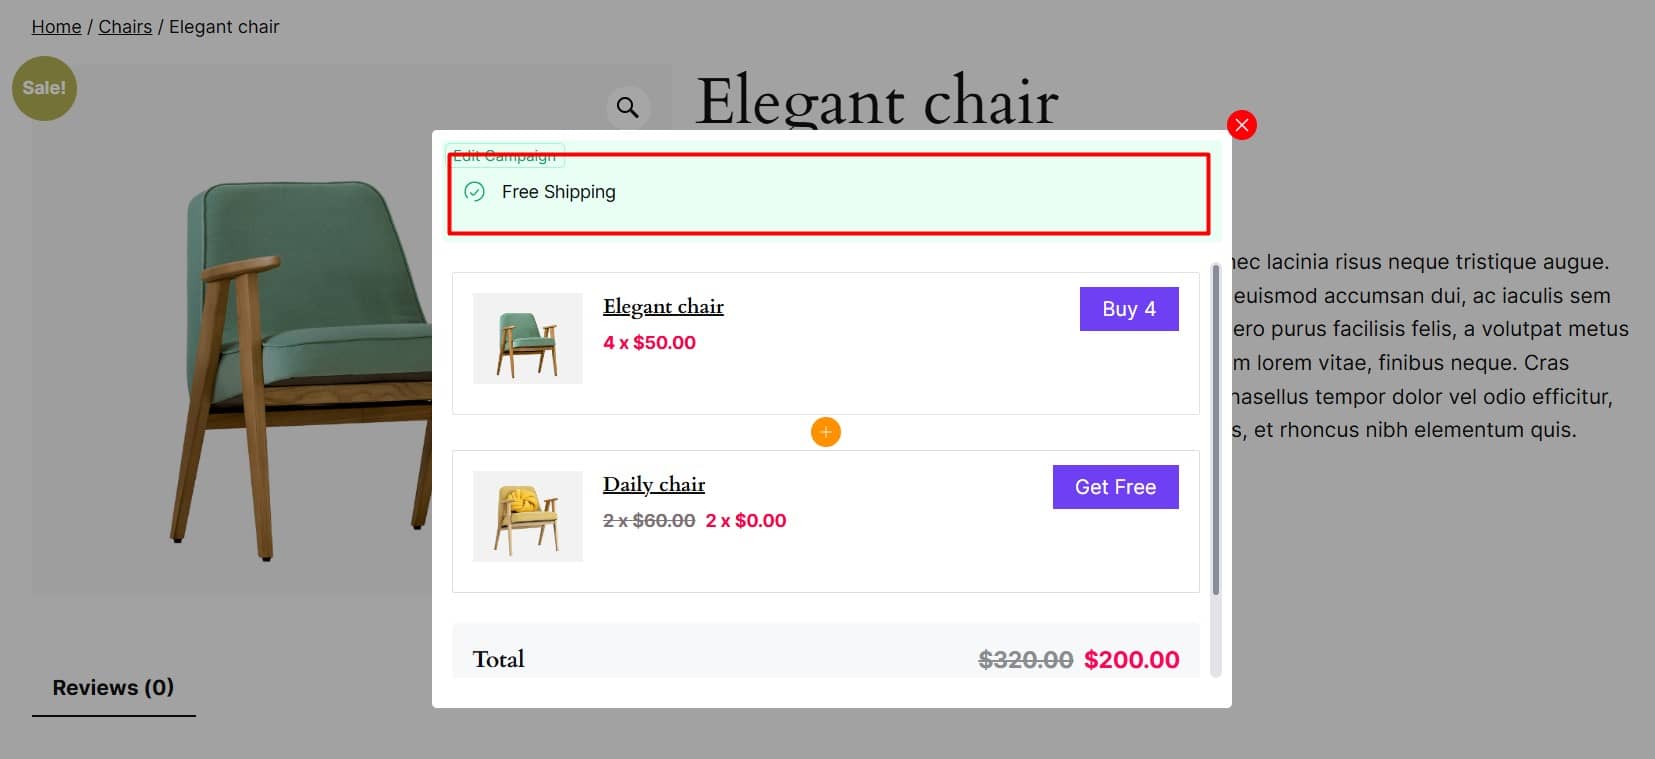
Can I Offer Free Shipping on WooCommerce?
Free Shipping offers customers free or discounted shipping when they meet certain conditions, such as a minimum order amount or for specific customer groups.
Example: Free shipping on orders over $75.
How to Set Up:
- Install and activate WowRevenue
- Navigate to WowRevenue -> Campaigns.
- Click Create Campaign and select any campaign type.
- Choose a display style: In-Page, Pop-Up, or Floating.
- Scroll down to Free Shipping.
- Enable and update the campaign.
Best Practices for Managing Discounts
You can make your discount campaign truly irresistible by following these effective practices:
💡 Communicate Clearly: Provide a detailed explanation of the discount and simple steps to qualify for the offer.
💡 Set Expiration Dates: Creating a sense of urgency boosts the effectiveness of discounts by 10x. Adding expiration dates for limited-time offers encourages customers to act fast.
💡 Monitor Performance: Use analytics to track the effectiveness of different discount strategies and optimize them accordingly.
💡 Avoid Overuse: Apply discounts strategically. While they can drive sales, excessive discounting may devalue your products and affect profit margins.
💡 Captivate with Design: Make your discount campaign stand out to customers! Elevate its appeal with custom colors, fonts, and spacing to create a design that drives customer action.
Start Offering Discounts in Your WooCommerce Store!
A well-planned discount strategy can greatly impact your store’s performance. You can use the built-in features of WooCommerce, add plugins for extra functionality, or create custom solutions.
We’ve covered all the discounts you can offer and guided how to implement them effectively.
With these tools and insights, you can manage your store’s pricing strategies more effectively.
You now know how to add discounts in WooCommerce – it’s time to answer some frequently answered questions.
FAQs
How Do I Set Usage Limits for Coupons?
Go to the Usage Restrictions and Usage Limits tabs in your coupon settings. You can set the total number of times a coupon can be used, limit the coupon to a specific number of items, or restrict the number of uses per customer.
Can I Exclude Specific Products or Categories from Coupons?
Yes, you can choose which products or categories to include or exclude. Navigate to the Usage Restrictions tab. You can also exclude sale items to prevent discounts from stacking.
How Can I Offer Free Shipping with a Coupon?
Enable Allow Free Shipping in the General tab of your coupon settings and ensure a free shipping method is set up in your WooCommerce settings. This works only if the free shipping method requires a valid coupon.